
Blackmagic Design URSA Camera, the world's first high end digital film camera designed to revolutionize workflow on set. This camera conatins a massive 10 inch fold out on set monitor, a new user upgradeable 4.6K Super 35 image sensor with a massive 15 stops of dynamic range, 12G-SDI for handling the ergonomics of large film crews as well as single person use. It gives you two recording modes: Apple ProRes 422 HQ and losslessly compressed CinemaDNG RAW.
However, something turns to be frustrated when you importing Blackmagic Ursa 4K footage into Premiere Pro CC/CS6/CS5 for further editing. On one hand, ProRes in a MOV file format from Blackmagic URSA is beyond the compatibility of Adobe Premiere Pro. What’s more, handling 4K video in Adobe Premiere Pro (CS4/CS5/CS6/CC) is extremely hardware intensive. To solve those problems, you're advised to compress and convert Blackmagic 4K files to MPEG-2, which ensures the maximum efficiency and quality when working with Premiere Pro.
Here I'll take Brorsoft 4K Video Converter for Mac as example to walk you through the conversion of 4K to MPEG-2 for Premiere Pro. Applying it, you are able to convert Blackmagic 4K files to Adobe Premiere more compatible format MPEG-2 without quality loss. Plus, this 4K video app can also encode any 4K videos including XAVC/XAVC S, 4K MP4, 4K MOV, etc to FCP, iMovie, Avid Media Composer, etc.
Step 1. Download, install and run the BlackMagic 4K Converter Mac and click "Add Videos" icon to load your source videos from Blackmagic URSA.

Step 2. Choose ProRes as output format
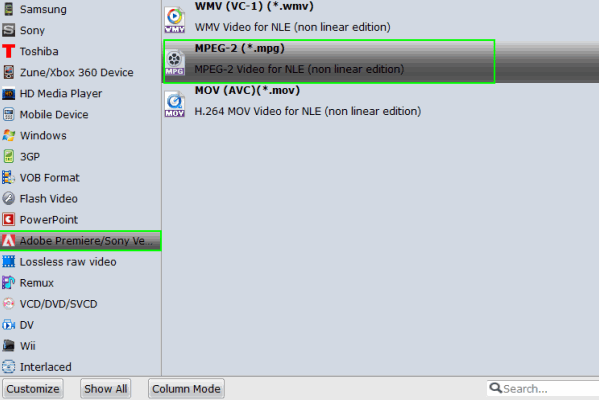
2. Click on the “Format” bar and choose a best editable format. For editing Blackmagic 4K in Adobe Premiere, choose Adobe Premiere/Sony Vegas --> MPEG-2(*.mpg) as output
format.
Step 3. Adjust video, audio settings
3. Set proper video/ audio parameters. Click the “Settings” button and set proper video/ audio parameters. You can reset set the video size, bitrate and fame rate. You can keep original 4K resolution or adjust video size to 2K or 1080 full HD as you need.
Step 4. Start conversion
After all necessary settings, hit the convert button to start the 4K video to MPEG-2 conversion on Mac OS X. Once the conversion process shows in 100%, click Open to get the output videos. Create a project and start editing 4K video in Premiere Pro CC/CS6/CS5 with light speed.
Read More:
How to Import Blackmagic Design URSA Camera 4K files to FCP X/7
How to Import 4K video to Final Cut Pro 6/7/X
Top 5 4K Video Converter for Mac
However, something turns to be frustrated when you importing Blackmagic Ursa 4K footage into Premiere Pro CC/CS6/CS5 for further editing. On one hand, ProRes in a MOV file format from Blackmagic URSA is beyond the compatibility of Adobe Premiere Pro. What’s more, handling 4K video in Adobe Premiere Pro (CS4/CS5/CS6/CC) is extremely hardware intensive. To solve those problems, you're advised to compress and convert Blackmagic 4K files to MPEG-2, which ensures the maximum efficiency and quality when working with Premiere Pro.
Here I'll take Brorsoft 4K Video Converter for Mac as example to walk you through the conversion of 4K to MPEG-2 for Premiere Pro. Applying it, you are able to convert Blackmagic 4K files to Adobe Premiere more compatible format MPEG-2 without quality loss. Plus, this 4K video app can also encode any 4K videos including XAVC/XAVC S, 4K MP4, 4K MOV, etc to FCP, iMovie, Avid Media Composer, etc.
Step 1. Download, install and run the BlackMagic 4K Converter Mac and click "Add Videos" icon to load your source videos from Blackmagic URSA.
Step 2. Choose ProRes as output format
2. Click on the “Format” bar and choose a best editable format. For editing Blackmagic 4K in Adobe Premiere, choose Adobe Premiere/Sony Vegas --> MPEG-2(*.mpg) as output
format.
Step 3. Adjust video, audio settings
3. Set proper video/ audio parameters. Click the “Settings” button and set proper video/ audio parameters. You can reset set the video size, bitrate and fame rate. You can keep original 4K resolution or adjust video size to 2K or 1080 full HD as you need.
Step 4. Start conversion
After all necessary settings, hit the convert button to start the 4K video to MPEG-2 conversion on Mac OS X. Once the conversion process shows in 100%, click Open to get the output videos. Create a project and start editing 4K video in Premiere Pro CC/CS6/CS5 with light speed.
Read More:
How to Import Blackmagic Design URSA Camera 4K files to FCP X/7
How to Import 4K video to Final Cut Pro 6/7/X
Top 5 4K Video Converter for Mac
No comments:
Post a Comment