Wednesday, March 30, 2016

Convert & Import MPG video files to iMovie for further editing

Summary: This article tells you an easy way to convert and import .mpg video files to iMovie for further editing without any hassles.


Supposing you have some MPEG/MPG video files stored on your Mac or recorded from your camera and wanna import them into iMovie for further editing, only to encounter annoying importing issues? If so, you are in the right place. This article mainly talks about why some MPG videos are not supported by iMovie and how to transfer MPG to iMovie on Mac OS X(El Capitan included). Keep reading on...

For your knowledge, iMovie generally can recognize MPEG files. However, if your MPG files are mixed (multiplexed) MPEG-1 or MPEG-2 videos, then iMovie won't accept them because of the codec incompatibility. And as we know, Apple InterMediate Codec(AIC) is the the most compatible codec for iMovie. In a short, transocoding MPEG(MPG) files to AIC with a third party program is an easy way to edit MPG videos in iMovie 08/09/11.

Here Brorsoft Video Converter for Mac is recommended as the best choice to help your change MPG to iMovie. Simply add your videos, select iMovie as the output format and you'll get videos that are highly compatible with iMovie (iMovie 11) in a few minutes. Besides transcoding MPG to iMovie supported videos with optimized settings while keeping the video quality, the easy-to-use toolkit can also convert all other popular video formats like MP4, AVI, MXF, Canon/Nikon DLSR MOV, WMV, MKV, FLV, M2TS, VOB, etc. to iMovie as well as Final Cut Pro, Avid Media Composer, Adobe Premiere Pro, Premiere Elements natively supported video formats on Mac OS X (Yosemite, El Capitan included) with fast encoding speed. See how below about converting MPG files to iMovie format.

How to Convert MPG files for Editing in iMovie smoothly

Step 1: Import MPG videos

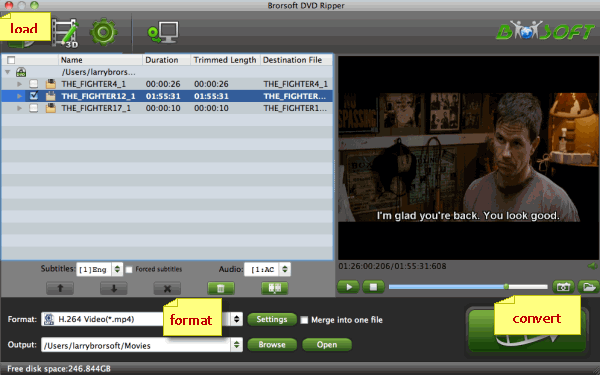
Run MPG to iMovie Converter and you can import MPG/MPEG clips to the program through “Add Video” button or “Add from folder” button. If you like, check the “Merge into one” box to join MPG clips together.


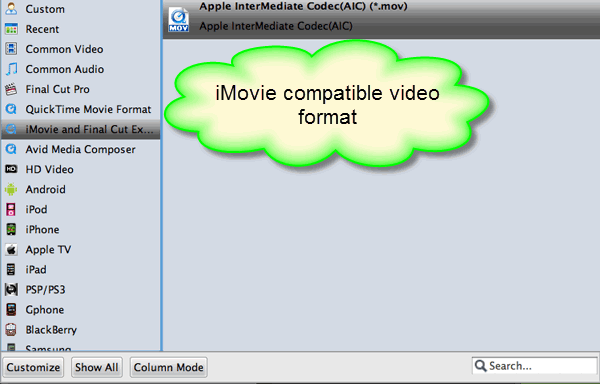
Step 2: Choose iMovie compatible format

When the files are loaded, you can simply choose "iMovie and Final Cut Express -> Apple InterMediate Codec (AIC) (*.mov)" as the output video format, in this option all the key specs like video resolution, frame rate, bitrate has been optimized for using in iMovie.


Tip: If the default settings do not fit you requirement, you can click “Settings” icon to and enter “Profile Settings” panel to adjust video size, bit rate, frame rate, sample rate and audio channels.

Step 3: Start MPG to MOV Conversion for iMovie

Click “Convert” button to start encoding MPG to AIC .mov for iMovie on Mac OS X.

When the mpg to iMovie conversion task is finished, click “Open” button to get the exported files for transferring to iMovie 8/9/11 with easy playback or editing.

More articles:

How to Get MPG to Play in Final Cut Pro smoothly

How to Import AVI files into iMovie

How to Convert VOB files to work in iMovie


Wednesday, March 23, 2016

Downscale DJI Phantom 4 4k to 1080p for better playback and editing

Summary: This article aims to elaborate on how to compress/downscale DJI Phantom 4 4K footage to 1080p for better playback and editing.


Not long ago, DJI has released its latest top-end consumer drone, the Phantom 4, has great advancements against its predecessor in many aspects. Thanks to its added features of object tracking, collision avoidance, tap-to-fly, etc coupled with longer battery life, smoother handling and more stunning 4k recording ability, make it absolutely the photographer's choice. While on the other hand, we have found it not easy to play the DJI 4K videos on tablet/smartphones or edit the 4K videos in NLEs like Adobe Premiere, Final Cut Pro, Avid, iMovie, etc.

Actually, editing/playing a 4K video requires more computing power and it could be more time-consuming. In term of the majority of playback, editing work is still being finished in 1080p, for those who wanna play and edit DJI Phantom 4 4K videos(especially on an old computer), we highly suggest you to downsize DJI Phantom 4 4K recordings to 1080p then edit the project in 1080p. Although there are multiple tools and utilities can convert and compress the ultra HD videos, few of them can process at a fast speed. Brorsoft 4K Video Converter for Mac is considered to be the best 4K to 1080 converter.

It is surely in the support of compressing DJI Phantom 4 4K videos to 1080p faultlessly. What’s more, this video app can help you to convert 4K MOV/MP4 from DJI Phantom 4 to FCP/Adobe Premiere/Avid MC, iMovie more compatible format like Apple ProRes, MPEG-2, DNxHD, Apple InterMediate Codec, etc. Thanks to Brorsoft Video Converter for Mac, you can trim, crop and retouch your 4K videos onto Mac in clicks. For Windows (Windows 10 included) users, the Windows version Video Converter is the alternative choice. Now, download the software on computer and follow the guide below to start conversion.

Guide: How to downscale 4K to 1080p from DJI Phantom 4 MP4/MOV footage

Step 1. Load DJI Phantom 4 4K Video

Install the DJI Phantom 4 4K to 1080p converter program on Mac and run it. Drag the 4K video clips to the software. Or you can also click "Add video" button on the top of the main interface to import video to the program.


Step 2. Decide Output Format

Click the "Format" drop down list to select MOV, MPG, AVI, etc format from "Common Video" as you want. Since this video converter also provides optimal profiles for kinds of editing programs and media devices, you can also select a proper format that best meets your needs.


Step 3. Downsize original 4K resolution at 1080p

Click "Settings" button; you can adjust video and audio settings, including codec, aspect ratio, bit rate, frame rate, sample rate, and audio channel. To down-convert ultra HD 4K to 1080p, do remember adjusting video size to 1920*1080. That is the exact 1080p.


Step 4. Start 4K to 1080p Conversion

Hit "Convert" button to let the DJI Phantom 4 4K to 1080p conversion begin. When the conversion finished, check the generated 1080p video, you will certainly be satisfied with its final video quality. It would be much easier for you to playback and edit.

More articles:

Edit Blackmagic Design URSA Camera 4K files on Premiere Pro CC/CS6/CS5 smoothly

How to Import Blackmagic Design URSA Camera 4K files to FCP X/7

Panasonic HC-VX870K 4K Workflow with Avid Media Composer


Wednesday, March 16, 2016

How to Transfer DVD to iMovie on Mac OS X

Summary: This article talks about how to import DVD clips into iMovie for making your own masterpieces.


iMovie is a well-known video editing software developed by Apple Inc. It allows users to share their favorite moments, and create amazing HD movies and Hollywood-style trailers. With iMovie, you can make videos and share them on the internet when you’re lying on the beach without moving your body, and also create a birthday party movie and send it to your parents. What if we want to edit DVD clips with iMovie?

In general, suppose you want to edit a homemade DVD in iMovie on Mac, you can import the DVD video to iMovie without using DVD ripping software like Handbrake only if you still had the original video, which should be created by iPhone, iPad or other Apple devices instead of any other HD camcorders. While when it comes to commercial DVDs, DVD Ripper maybe a must, since Handbrake is incapable of ripping DVD with copy protections. Luckily, there is still other DVD to iMovie ripping software solutions for Mac you can easily find, such as Brorsoft DVD Ripper for Mac.

With its help, you can effortlessly convert DVD video to iMovie highly compatible Apple InterMediate Codec .mov without losing any video quality on Mac OS X (El Capitan included). Besides iMovie, this excellent utility also offers other advanced codecs like ProRes, MPEG-2, DNxHD for editing smoothly on Final Cut Pro, Premiere Pro, Avid Media Composer and more! Now let's walk you through the process of ripping DVD to iMovie with smooth workflow.


How to convert DVD to iMovie supported video format
STEP 1. Load DVD movies

Insert the DVD disc into your Mac's DVD drive and click Import DVD icon to load the DVD movies. Or simply drag the DVD disc icon on the desktop to the program. Loaded DVD movies can be previewed in the right preview window and you're free to take snapshots of your favorite DVD movies. In addition, you can select the subtitle and audio track as you like.


STEP 2. Select output format

Next, choose an output format for iMovie. Click the Format icon to open the format list. Then select iMovie and Final Cut Express -> Apple InterMediate Codec (AIC)(*.mov), as the output format to get videos with optimized settings for iMovie.


Tip: If you want to customize the profile, you can click settings to use the parameters you want.

STEP 3. Start conversion

When all the settings are fine, click the Convert button to start converting your DVD movies to optimized AIC .mov video files for iMovie. When then conversion completes, click the Open button to get the ripped video files. Launch iMovie and click File > Import > Movies to import the converted videos to iMovie for further editing. Just create your masterpiece with joy!

Related Guides:

Rip & Import DVD to Sony Vegas Pro 13/12/11/10

How to Import DVD footage to Adobe Premiere Pro CC/CS6/CS5


Wednesday, March 9, 2016

Tutorial on Ripping and Importing Blu-ray to Sony Vegas Pro 13/12/11/10

Summary: Have trouble of importing Blu-ray movies into Sony Vegas Pro? Well, this article shows you how to transcode Blu-ray to WMV/MPEG-2 for editing smoothly on Sony Vegas Pro 13/12/11/10.
As an ideal video editing tool, Sony Vegas Pro is widely used by video professionals and hobbyists. Nowadays there are even some people want to copy their favorite Blu-ray clips into Sony Veags Pro for creating their own masterpieces. While those users found easily that Sony Vegas doesn't support Blu-ray importing directly. Then you may can't help asking there is any possible to transfer Blu-ray contents into Sony Vegas Pro for postproduction?

Fortunately, there is an easy way to fix this problem. As we all know, the most compatible video format for Sony Vegas Pro editing is MPEG and WMV format. So to import and edit Blu-ray videos on Sony Vegas Pro smoothly, you'd better change Blu-ray into any of above formats that work natively with your Sony Vegas Pro 10/11/12/13. To perform the task flawlessly, Brorsoft Blu-ray Ripper is highly recommended here.

With it, you can rip and convert Blu-ray movies to Sony Vegas Pro most compatible format without quality loss in a fast speed. Besides this excellent program also offers various presets optimal for Adobe Premiere Pro, Avid Media Composer, Windows Movie Maker, Powerdirector, and more NLEs on Windows. Now download the program and follow the simple steps below to learn how to transcode Blu-ray clips for editing in Sony Vegas Pro without any trouble.

Download Blu-ray to Sony Vegas Converter:


How to import Blu-ray movies to Sony Vegas Pro for smooth editing

Step 1. Download, install and launch the Blu-ray ripper. Click the disc button to choose the Blu-ray files you want to convert. Note that you can also import Blu-ray Folders, ISO/IFO files.


Step 2. Set Sony Vegas supported format

Click "Format" bar to determine output format. Follow "Adobe Premiere/Sony Vegas" and select "MPEG-2(*.mpg)" as the output format. Besides, you can also choose WMV (VC-1) (*.wmv) if you want to get a relatively smaller output file.


Step 3. If you would like to customize the video and audio parameters, you can click "settings", adjust the parameters as you want, like Video Codec, aspect ratio, bit rate, frame rate, Audio codec, sampling rate, bit rate, channels.

Step 4. Click "Convert" to start to convert Blu-ray to Sony Vegas Pro. When the conversion completes, locate the results videos ready to be imported into Vegas.

More Guides:

Rip & Import DVD to Sony Vegas Pro 13/12/11/10

Upload Blu-rays to Dropbox for viewing and streaming freely

Easiest Way to Copy Blu-ray/DVD Movies to iTunes Library

Wednesday, March 2, 2016

Convert Dxtory AVI for Editing in After Effects

Summary: This article focus on how to convert Dxtory AVI to After Effect compatible MPEG-2, so as to edit Dxtory AVI files in After Effect without any hassles.


Dxtory, an excellent game recording software, is capable of recording videos up to 120 frames per second (fps), which contributing to the overall quality of your video and giving it a smoother look. For capturing videos of gameplay, whether you're an advanced user or a beginner, Dxtory is a good option. While it's literally a nightmare when importing Dxtory AVI files into After Effect or other editing software for further editing.

Technically, AVI is a container video format rather than a specific video format, which may includes different video and audio codecs. And if your AVI videos inside exist something unfriendly codecs like DivX/Xvid with After Effects, then your AVI videos will certainly be rejected by After Effects. In order to edit all kinds of AVI videos in After Effects, the ultimate and effective solution is to convert Dxtory AVI to a more editing-friendly format like MPEG-2 for After Effects.

Actually, it’s not as difficult as you imagine. What’s your need is just a common video converter like Brorsoft Video Converter. This program features high efficiency and seamless conversion. With it, you can easily transcode Dxtory AVI to a different format like MPEG-2 with least quality loss. You should then be able to import the new file into After Effects with smooth editing without any trouble. It will ensure a perfect Dxtory AVI file importing, playing and editing workflow with After Effects. Apart from After Effects, this gorgeous program also offers other advanced encoders for Premiere Pro, Avid Media Composer, Final Cut Pro, and more. If you are a Mac user, turn to the Mac version - Brorsoft Video Converter for Mac. Below is how to do it.

[/img]

How to Convert Dxtory AVI to MPEG-2 for After Effects

Step 1: Import Dxtory AVI files

Launch the App you downloaded, and you can either click "Add" button to import Dxtory AVI files, or directly drag and drop the files into this program.


Step 2: Select output format

To edit AVI files in After Effects without problem, Adobe Premiere/Sony Vegas -MPEG-2 (*.mpg) should be one of the suitable output formats.


Tip: If needs, users can adjust the video and audio parameters, including the Bitrate of Video&Audio, Video Size, Sample Rate, Frame Rate, Audio Channels, etc., by clicking the Settings button on the main interface for getting the best quality before conversion .

Step 3: Start the conversion

Finally, click the convert button, then AVI to MPEG-2 conversion for After Effects (CS4/CS5/CS6) will start immediately. Once the process completes, you can get your Dxtory AVI files and After Effects to play nicely.

Related Articles:

Converting Dxtory Recordings for Editing in FCP 6/7/X Smoothly

Tips for Smoothly Editing Dxtory AVI Files in Sony Vegas

How to Convert DXTory AVI to MP4 Quickly and Easily