
MTS is commonly found in avchd video clips recorded from camcorders of Panasonic, Sony, JVC, and Canon. Right click the AVCHD file, you can find footage are divided into several .mts or m2ts clips for preserving. These MTS/ M2TS files are natively supported by Final Cut Pro. But usually, you may come across various problems when you import M2TS/MTS to Final Cut Pro for editing. Why it happened?
In fact, Final Cut Pro X and FCP 7 makes it easy to work with the latest AVCHD file-based devices, but only several kinds of camcorders like Sony XDCAM HD are involved in the list. So when you are experiencing difficulties with ingesting AVCHD .mts or .m2ts files into Final Cut Pro, you may obtain an unlisted cam. Besides, the highly-compressed AVCHD content is not so friendly for editing software. Then, how to get Final Cut Pro working perfectly with AVCHD MTS footage? A best way is to convert MTS files to ProRes .mov, something ensuring maximum editing quality and efficiency when working with FCP.
In order to finish this task, you're highly advised to adopt the the easy-to-use yet professional app called Brorosft MTS/M2TS Converter for Mac which can be used as a AVCHD MTS to FCP Converter under Mac OS X 10.11 El Capitan, Mac OS X Yosemite, Mac OS X 10.9 Mavericks, 10.8, etc. It is free, clean and safe to install and use. With it, you can effortlessly transcode MTS to Apple ProRes 422, ProRes 422 HD, ProRes 422 LT, ProRes 4444 for FCP, MPEG-2 for Premiere Pro, DNxHD .mov for Avid MC, etc., and it works well and converts flawlessly. Below is how.
Free Download the AVCHD Converter Mac:
 ( Note: Click here for OS X 10.5)
Step 1: Install and run the Mac MTS to FCP Converter, you can click "Add Video" button (or "Add from folder") to load AVCHD MTS source files.
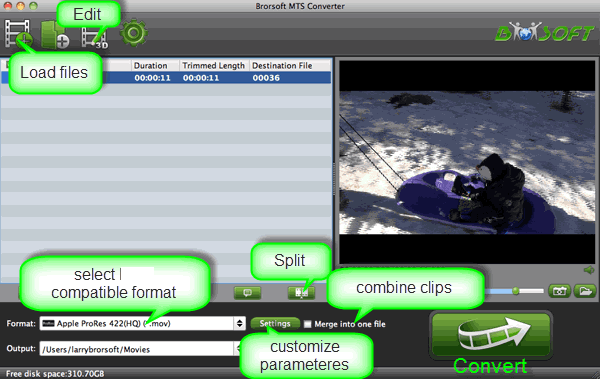
Step 2: Click on "Format" bar and set a FCP friendly format in dropdown-list. You are advised to "Follow Final Cut Pro" template and "Apple ProRes 422 (*.mov)" format.

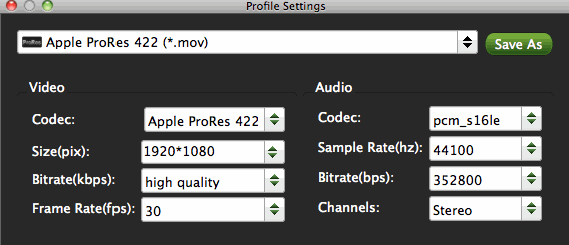
Step 3: Click the "Settings" button and customize proper video/audio parameters if necessary. Video size, bitrate and fame rate are flexible and can be adjusted as you like. Usually 1920*1080 video size and 30fps video frame rate are recommended for FCP editing.
Step 4: Click "Convert" to start converting the MTS/M2TS to Apple ProRes 422 codec. After conversion just click the "Open" button to locate converted video files for FCP post-production seamlessly.
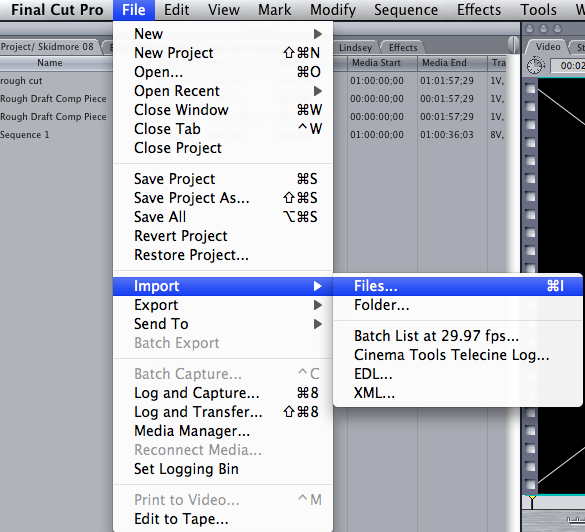
Step 5: Launch Final Cut Pro 7/FCP 6, choose File >> Import >> Files..., and browse to where you save the converted AVCHD clips to. Choose the videos that you'd like to add.
In fact, Final Cut Pro X and FCP 7 makes it easy to work with the latest AVCHD file-based devices, but only several kinds of camcorders like Sony XDCAM HD are involved in the list. So when you are experiencing difficulties with ingesting AVCHD .mts or .m2ts files into Final Cut Pro, you may obtain an unlisted cam. Besides, the highly-compressed AVCHD content is not so friendly for editing software. Then, how to get Final Cut Pro working perfectly with AVCHD MTS footage? A best way is to convert MTS files to ProRes .mov, something ensuring maximum editing quality and efficiency when working with FCP.
In order to finish this task, you're highly advised to adopt the the easy-to-use yet professional app called Brorosft MTS/M2TS Converter for Mac which can be used as a AVCHD MTS to FCP Converter under Mac OS X 10.11 El Capitan, Mac OS X Yosemite, Mac OS X 10.9 Mavericks, 10.8, etc. It is free, clean and safe to install and use. With it, you can effortlessly transcode MTS to Apple ProRes 422, ProRes 422 HD, ProRes 422 LT, ProRes 4444 for FCP, MPEG-2 for Premiere Pro, DNxHD .mov for Avid MC, etc., and it works well and converts flawlessly. Below is how.
Free Download the AVCHD Converter Mac:
( Note: Click here for OS X 10.5)Step 1: Install and run the Mac MTS to FCP Converter, you can click "Add Video" button (or "Add from folder") to load AVCHD MTS source files.
Step 2: Click on "Format" bar and set a FCP friendly format in dropdown-list. You are advised to "Follow Final Cut Pro" template and "Apple ProRes 422 (*.mov)" format.
Step 3: Click the "Settings" button and customize proper video/audio parameters if necessary. Video size, bitrate and fame rate are flexible and can be adjusted as you like. Usually 1920*1080 video size and 30fps video frame rate are recommended for FCP editing.
Step 4: Click "Convert" to start converting the MTS/M2TS to Apple ProRes 422 codec. After conversion just click the "Open" button to locate converted video files for FCP post-production seamlessly.
Step 5: Launch Final Cut Pro 7/FCP 6, choose File >> Import >> Files..., and browse to where you save the converted AVCHD clips to. Choose the videos that you'd like to add.
No comments:
Post a Comment