Saturday, January 30, 2016

Easy way to Transfer Sony FDR-X1000V 4K to FCP/Premiere

Summary: Encounter trouble while importing Sony FDR-X1000V 4K XAVC S files to FCP or Premiere Pro for editing? This article will teach you how to open Sony FDR-X1000V 4K XAVC S files in FCP or Premiere Pro smoothly.


The Sony X1000V is by far Sony's best attempt at an action cam. A big performance plus on the X1000V is the ability to record 4K at a whopping 100 Mb/s which improves image motion and overall quality. With its Wi-Fi and GPS connectivity, you can go just about anywhere, prove you are there in glorious 4K quality and share your experiences with your online friends wherever they are in the world.

Maybe you have recorded some footage and wondering how to import Sony FDR-X1000V XAVC S videos to FCP, Premiere Pro or other editing software for editing natively on Mac. As we know, Sony FDR-X1000V recordings are in XAVC S or MP4 format and XAVC S, a long GOP inter-frame codec, does not appear to be supported by most NLEs including FCP or Premiere Pro. So you may encounter importing problems, or can’t edit Sony FDR-X1000V 4K footage in FCP or Premiere Pro smoothly, besides, it will take a long time to render. In order to fix all these problems, you'd better convert XAVC S from Sony FDR-X1000V to Adobe PP/FCP friendly codec initially.

Based on our multiple testing and other users’ feedback, here I highly recommend you try the Brorsoft XAVC S Video Converter for Mac which is able to convert XAVC S files from Sony FDR-X1000V to FCP, Premiere fully compatible format and keep original quality at the mean while. It can also export ProRes for Final Cut Pro, Apple InterMedaite Codec(AIC) for iMovie/FCE, DNxHD for Avid Media Composer and more NLE systems for native editing. Download the software and follow the guide to finish the conversion task. If you’re using a Windows, please turn to its equivalent Windows version- Video Converter, which can help you solve the XAVC S incompatibility issues on Windows(10).

Download the XAVC S Video Converter:

(Note: Click here for OS X 10.5)

How to Import Sony X1000V XAVC S to FCP/Premiere for editing

Step 1: Load XAVC S footage

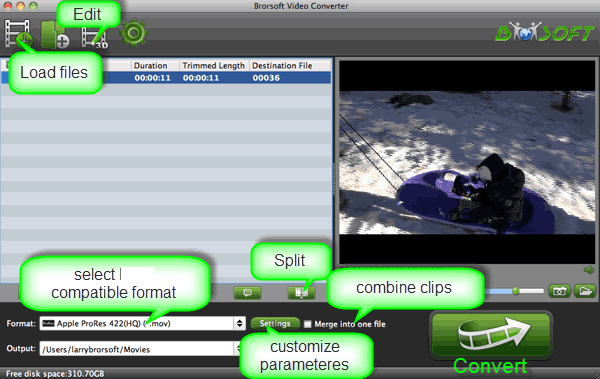
Launch the XAVC S to Premiere Pro Converter and click “Add File” button to locate the Sony FDR-X1000V XAVC S files you want to add. Or you can drag & drop the files into software window list directly.


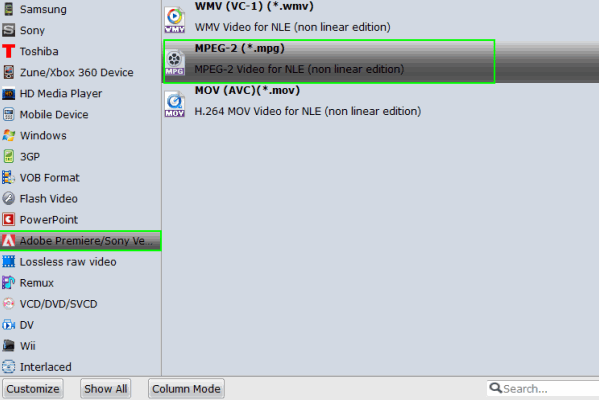
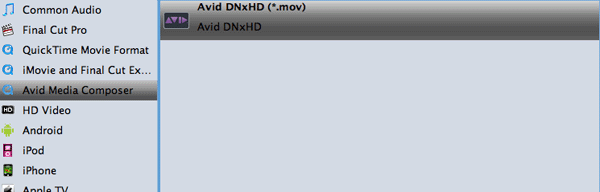
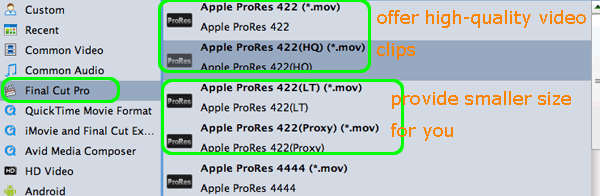
Step 2. Hit the Format box to select the specially designed video codec for editing in Premiere Pro and Final Cut Pro.

a. For importing Sony FDR-X1000V XAVC S to Final Cut Pro X/7, you can choose “Final Cut Pro> Apple PreRes 422(*.mov)” as output format.


b. To edit Sony FDR-X1000V XAVC S video in Premiere Pro, Adobe Premiere/Sony Vegas> MPEG-2(*.mpg) as the best video format for Premiere Pro. WMV, MOV formats are the good choice as well.


Step 3. Adjust the video and audio parameters, including the Bitrate of Video and Audio, Audio, Video Size, Sample Rate, Frame Rate, Audio Channels, etc., by clicking the Settings button on the main interface. Usually 1920*1080 video size and 30fps video frame rate are recommended for FCP and Premiere Pro editing.

Step 4. Click the arrow button to start transcoding Sony FDR-X1000V 4K XAVC S to .MOV(ProRes for FCP, MPEG-2 for Premiere) on Mac OS X.

After the conversion finished, you can easily transfer your 4K footage from Sony FDR-X1000V to FCP, Premiere for further editing without any problem.

More Articles:

Import Panasonic HC-X920 1080 60p/50p AVCHD to Premiere/Avid

How to Copy Blu-ray to Sony Vegas Pro 11/12/13

How to Import Blackmagic Design URSA Camera 4K files to FCP X/7

Editing TS files with FCP X/7/6 on Mac (El Capitan included)

How to Convert and Import WMV to Final Cut Pro for further Editing

Edit Sony RX1R II XAVC S in FCP 7

Import Panasonic VariCam 35 4K MXF to FCP without hassles

Tricks for Editing Panasonic GH4 4K footage in Final Cut Pro 7

Wednesday, January 27, 2016

Import Panasonic HC-X920 1080 60p/50p AVCHD to Premiere/Avid

Summary: Have some 1080/50p 60p AVCHD from Panasonic HC-X920 but encounter issues when importing to Premiere or Avid? In this article, we'll quickly walk you through the most effective way for working Panasonic HC-X920 footage with Premiere/Avid.


Ever have experienced Panasonic HC-X920, the top-of-the-line High Definition Camcorder? With it, you can record Full HD .mts clips at 1080/60p or 50p mode. While enjoying the stunning HD image quality, many folks complain that they have encountered kinds of issues when importing AVCHD 1080 60p/50p videos to some prevalent editors, including Premiere Pro, Avid Media Composer and so on for further editing as below:

"I want to edit the 1080 60p recordings from Panasonic HC-920 in Avid MC 5. But I couldn’t successfully importing the videos to MC with AMA. Any idea?"

"I have recently bought a Panasonic HD camcorder HC-X920 and got some 1080/50p AVCHD files. When I try to import clips into My Premiere CC, I get a message; "this mpeg is not supported." is there anyone here know how can I work it out?"

As a matter of fact, 1080 60p/50p is a non-standard frame rate, which usually used for capturing smooth slow motions and unsupported by common editing software including Premiere Pro, Avid Media Composer, etc. Fortunately, there is an easy way to fix the problems. Actually, it's not as difficult as you imagine. What you need is just a common video converter like Brorsoft Video Converter for Mac, which can be used as a professional and easy-to-use MTS/M2TS Converter for Mac(El Capitan included).

The program can help you transcode Panasonic HC-X920 1080 60p/50p AVCHD footage to various professional encoders, Apple Intermediate Codec, MPEG-2, ProRes and DNxHD, DVCPRO, HDV - ensuring maximum editing quality and efficiency when working with Avid Media Composer, Adobe Premiere, iMovie, FCP and more. Plus, with advanced audio and video in sync technology, the program is able to guarantee audio and video matching very well. If you are a Windows user, please turn to the Windows version. Now just get the program and follow the step-by-step guide below to convert and import Panasonic HC-X920 1080 60p/50p AVCHD footage to Adobe Premiere Pro CC/CS6, Avid Media Composer for editing smoothly.

Guide: Convert Panasonic HC-X920 AVCHD to Premiere/Avid

Step 1. Load the Panasonic HC-X920 AVCHD footage

Connect your Panasonic X920 HD camcorder to your Mac with USB2.0. Install, and launch Brorsoft MTS Converter on your Mac, and then click the adding button to import your AVCHD (.mts) clips.

Tip: You can select the "Merge into one" function to combine your multiple AVCHD files together.


Step 2. Select output format

By running Brorsoft Video Converter for Mac, there is no need to set the codec yourself, the program has optimized presets for Avid and Adobe Premiere.

Converting to Adobe Premiere Pro

To work you Panasonic HC-X920 AVCHD footage in Premiere CC/CS6/CS5, simply choose "MPEG-2" as the output format from "Editing" software.


Converting to Avid Media Composer

To edit the C500 footage in Avid smoothly, choose "DNxHD" for the output.


Tips: The default settings of the recommended presets work well and ensure a smooth editing. Of course, if you want to customize video and audio encoding settings, just click the "Settings" button to customize these settings. You can adjust the output video/audio resolution, frame rate, bit rate, etc. to customize the output files to get the best quality you want.

Step 3. Start transcoding

Finally, click the "Convert" button to start the conversion process. After a while, your files will be converted into a more editing-friendly format ready to be imported into Premiere or Avid.

More Articles:

How to Copy Blu-ray to Sony Vegas Pro 11/12/13

How to Import Blackmagic Design URSA Camera 4K files to FCP X/7

Editing TS files with FCP X/7/6 on Mac (El Capitan included)

How to Convert and Import WMV to Final Cut Pro for further Editing

Edit Sony RX1R II XAVC S in FCP 7

Import Panasonic VariCam 35 4K MXF to FCP without hassles

Tricks for Editing Panasonic GH4 4K footage in Final Cut Pro 7

Saturday, January 23, 2016

How to Copy Blu-ray to Sony Vegas Pro 11/12/13

Summary: Sony Vegas does not support Blu-ray importing and editing. To load Blu-ray files to Sony Vegas, you'll need to convert Blu-ray to a more editing-friendly format.


"I was wondering if someone could help me with a problem I am having with copying Blu-ray to Sony Vegas Pro? I need to get a short video clip from Blu-ray and edit in Sony Vegas Pro for my presentation. When I trying to import the Blu-ray into Sony Vegas Pro, it fails to read the disc. Any help?"

Sony Vegas is Windows-based video editing software for making home movies, especially for editing camcorder videos. There are may some occasions, like the above person, chances are you want to import Blu-ray to Sony Vegas Pro for further editing, only to encounter with tricky importing issues. Well, don't worry, this article I will show you a solution to import, edit Blu-ray files in Sony Vegas Pro 10/11/12/13 smoothly.

In fact, although Sony Vegas Pro can support a wide rang of file formats, as far as I know, still doesn't accept Blu-ray format. In addition, as we all know, most commercial Blu-ray discs are protected by various copy protections so that it's hard to copy Blu-ray contents directly. In this case, to fix all these problems you need a powerful third-party program which enables you to rip and convert Blu-ray to Sony Vegas Pro 13/12/11 preferred video formats.

In order to finish the task perfectly, you can use Brorsoft Blu-ray Ripper. It can easily convert Blu-ray to a more editing-friendly format for Sony Vegas Pro through bypassing all kinds of Blu-ray copy protections. No matter what version of the NLE apps you are applying, and what Windows system you are working on, this Blu-ray ripper will assist you to import Blu-ray files to Sony Vegas Pro as well as Adobe Premiere Pro, Pinnacle Studio, Windows Movie Maker, etc for editing smoothly. Download it and follow its step-by-step instruction below to learn how to rip and import Blu-ray to Sony Vegas Pro.

Download Blu-ray to Sony Vegas Converter:


How to import Blu-ray movies to Sony Vegas Pro for smooth editing

Step 1. Download, install and launch the Blu-ray ripper. Click the disc button to choose the Blu-ray files you want to convert. Note that you can also import Blu-ray Folders, ISO/IFO files.


Step 2. Click "Format" bar to determine output format. For smoothly editing in Vegas, you are recommended to choose "Adobe Premiere/Sony Vegas" and select "MPEG-2(*.mpg)". This format is best for Sony Vegas Pro editing.


Step 3. If you would like to customize the video and audio parameters, you can click "settings", adjust the parameters as you want, like Video Codec, aspect ratio, bit rate, frame rate, Audio codec, sampling rate, bit rate, channels.

Step 4. Click "Convert" to start to convert Blu-ray to Sony Vegas Pro. When the conversion completes, locate the results videos ready to be imported into Vegas.

Related Guides:

How to Import Blackmagic Design URSA Camera 4K files to FCP X/7

Editing TS files with FCP X/7/6 on Mac (El Capitan included)

How to Convert and Import WMV to Final Cut Pro for further Editing


Edit Sony RX1R II XAVC S in FCP 7


Import Panasonic VariCam 35 4K MXF to FCP without hassles


Tricks for Editing Panasonic GH4 4K footage in Final Cut Pro 7


Import & Edit Canon XC10 4K XF-AVC onto Davinci Resolve

Convert and Import Canon C500 4K MXF to DaVinci Resolve for Editing smoothly

Wednesday, January 20, 2016

How to Import Blackmagic Design URSA Camera 4K files to FCP X/7

Summary: Follow this tutorial to learn the best workflow for importing and editing Blackmagic Ursa 4K footage in Final Cut Pro X/7.

Blackmagic Design URSA Camera features a form factor that is designed to make it flexible enough to use on productions of all sizes. At the heart of the imaging system, Blackmagic URSA equips a 3840 x 2160 resolution, global shutter CMOS sensor with 12 stops of dynamic range. It offers you two recording modes: Apple ProRes 422 HQ and losslessly compressed CinemaDNG RAW.


After recording some amazing 4K videos with Blackmagic Design URSA camera, chances are you want to load these 4K footage into Final Cut Pro X/7 for making your own masterpiece. But sometimes you might get frustrated to find FCP cannot recognize Blackmagic URSA 4K footage. That's because Blackmagic camera recorded 4K RAW video format is beyond the compatibility of FCP, what’s more, handling 4K video in Final Cut Pro X/7/6 is extremely hardware intensive. To solve the problem, you need to convert BlackMagic Ursa 4K RAW files to Final Cut Pro supported format like ProRes 422 with Brorsoft 4K Video Converter for Mac.

The program is an easy-to-use yet professional Blackmagic 4K Converter. It’s able to convert 4K RAW files to Final Cut Pro X/7 more compatible format ProRes 422 or ProRes 4444 without quality loss. Plus, this 4K video app can also encode any 4K videos including XAVC/XAVC S, 4K MP4, 4K MOV, etc to Premiere Pro, iMovie, Avid Media Composer, etc. Besides, this 4K Video Converter is also available to customize the output resolutions to any size like 1080p, 2K, 4K as users want. Download the tool and start the 4K video conversion on Mac(Mavericks included).

Convert Blackmagic URSA 4K videos to ProRes MOV for FCP X/7 on Mac

Step 1. Download, install and run the BlackMagic 4K Converter Mac; click "Add Videos" icon to load your source videos from Blackmagic URSA.


Step 2. Click the "Format" bar and select Final Cut Pro> Apple PreRes 422(*.mov) as output format.


Step 3. Set proper video/ audio parameters. Click the “Settings” button and set proper video/ audio parameters. You can reset set the video size, bitrate and fame rate. You can keep original 4K resolution or adjust video size to 2K or 1080 full HD as you need.


Step 4. Hit the convert button, it will start converting 4K RAW from Blackmagic URSA to Final Cut Pro X/7 compatible format immediately. Soon after the conversion, just click “Open” button to get the generated files for natively editing in Final Cut Pro X/7/6 perfectly.

Related Guides:

Editing TS files with FCP X/7/6 on Mac (El Capitan included)

How to Convert and Import WMV to Final Cut Pro for further Editing


Edit Sony RX1R II XAVC S in FCP 7


Import Panasonic VariCam 35 4K MXF to FCP without hassles


Tricks for Editing Panasonic GH4 4K footage in Final Cut Pro 7


Import & Edit Canon XC10 4K XF-AVC onto Davinci Resolve

Convert and Import Canon C500 4K MXF to DaVinci Resolve for Editing smoothly

Workflow for Panasonic GH4 4K MP4/MOV to Premiere Pro

Saturday, January 16, 2016

Editing TS files with FCP X/7/6 on Mac (El Capitan included)

"I'm importing some transport stream files (.ts) into FCP 7. All files were captured from the same device which captures from a satellite. Some files import fine, while others may either not import at all or import with only half of the audio. Is there anything I might be missing in regards to these types of clips?"


Normally, we can get TS files from HD camcorders such as Sony, Panasonic and cannon. But TS video cannot be played on many media players and portable devices because of incompatibility. When you tried to load the TS files int Final Cut Pro (Even FCP X) for some editing, you will encounter problems mentioned above. Is there any possible ways to resolve the problem? After a while Google searching, I found out the solution to fix the TS video to FCP issues. If you are in such situation, just follow the guide and fix the annoying issue.

At first, I tried a third-party tool MPEG Streamclip, but the application either froze or told me that it couldn’t find the first frame of the .ts file. So eventually I accepted another more practical method recommended online to convert TS to a Final Cut Pro more friendly-editing video format - Apple ProRes codec. In order to finish the task, one of my friend recommended me try the Brorsoft Video Converter for Mac, which was turned out to be a great choice.

With it, I can effortlessly transcode TS files to ProRes for smoothly editing in Final Cut Pro X or FCP 7 with the best quality. If you're editing TS movie with Final Cut Pro 6/7/X, iMovie, Avid Media Composer, Premiere Pro, Final Cut Express, chances are you already installed this great utility. If not, download it now and learn the step-by-step TS to ProRes conversion. Below I'll take the best Mac TS converter program as example to fast walk you through the workflow,

Download TS video converter:

(Note: Click here for OS X 10.5)

Guide on converting TS to Final Cut Pro

1. Install and launch the TS to FCP Converter, and then click "Add Video" button to import .ts files.


2. Click on the “Format” bar and get the dropdown menu, then move your pointer to choose “Final Cut Pro> Apple PreRes 422" or "Apple ProRes 422 HQ" or "Apple ProRes 4444" as the output format.


Tips: In case the default settings do not fit your requirement, you can click "Settings" button and enter "Profile Settings" panel to adjust video size, bit rate, frame rate, sample rate and audio channels.

3. Click Convert button to start converting TS to ProRes for Final Cut Pro 6/7/X on Mac OS X.

Once the conversion completes, you can click "Open" to find the .MOV videos which can be directly imported to FCP 6/7/X. You've done.

Related Guides:

How to Convert and Import WMV to Final Cut Pro for further Editing

Edit Sony RX1R II XAVC S in FCP 7

Import Panasonic VariCam 35 4K MXF to FCP without hassles

Tricks for Editing Panasonic GH4 4K footage in Final Cut Pro 7

Import & Edit Canon XC10 4K XF-AVC onto Davinci Resolve

Convert and Import Canon C500 4K MXF to DaVinci Resolve for Editing smoothly

Workflow for Panasonic GH4 4K MP4/MOV to Premiere Pro

Importing DJI Phantom 3 4K to Premiere Pro for smooth editing

How to Import & Edit Canon EOS C500 MXF files onto Premiere and Avid

Guide on Converting 4K to 1080p ProRes on Mac/Windows

Wednesday, January 13, 2016

Edit Sony RX1R II XAVC S in FCP 7

Summary: Meet any problem when trying to edit XAVC S files recorded by Sony DSC-RX1R II in Final Cut Pro 7? This tutorial will tell you how to solve it.


A few days ago I was invited to attend a friend's wedding, the wedding was running smoothly and we played very happily. During the wedding, I used my new bought Sony RX1R II to record some amazing moments. After returning home, I intended to edit those captured videos in FCP 7 before uploading to YouTube and Facebook for sharing with friends and family. Unfortunately, something wrong happened to me, whenever I imported Sony RX1R II XAVC S footage into FCP 7, always a "codec error" message would pop up, eventually I failed to edit Sony XAVC S clips in FCP 7.

After searching high and low, I figured out the problem may do something with the XAVC S codec. According to the Apple official website, the complicated codec XAVC S(in an MPEG-4 wrapper) does not work with FCP X 10.0.9 and its older version. Therefore, some guys on concerned forums suggested me update my FCP version. It was so complicated and time-confusing that I gave up. Then the tip of converting XAVC S to ProRes for editing in FCP 7 accidentaly dashed into my eyes. I tried that method with its recommended third-party program - Brorsoft XAVC S to FCP Converter for Mac, which turned out beyond my imagination.

Overall, the program can effortlessly assit you transcode XAVC-S to Apple ProRes for FCP X/7/6 with several simple steps. Just do some clicks on your mouse with your finger, you can easily convert XAVC S files to ProRes .mov on Mac and then import XAVC S video into FCP X/7/6 for editing smoothly. Better still, the smart gadget also equipped with some easy but pratical editing functions like cropping, trimming, adding watermark, etc. Below is a brief workflow.

Download XAVC S to FCP 7 Converter:

(Note: Click here for OS X 10.5)

Guide: Transcode and Import Sony XAVC S to Final Cut Pro 7
Step 1: Add XAVC S videos

Install the XAVC S converter program on Mac and run it. Drag the XAVC S files to the software. Or you can also click "Add" button on the top of the main interface to import video to the program.


Step 2: Choose FCP compatible format

Go to "Format" bar and choose "Final Cut Pro > Apple ProRes 422 (*.mov)" as output format for editing XAVC S footage in Final Cut Pro X or FCP 7.


Tips: Adjust video, audio settings

Click the "Settings" button and customize proper video/audio parameters including Video size, bitrate and fame rate and mroe. Usually 1920*1080 video size and 30fps video frame rate are recommended for FCP editing. Well, if you prefer to work with 4K video, you can keep the original 4K resolution.


Step 3: Start XAVC S to ProRes conversion

Click "Convert" to start transcoding XAVC S to ProRes for FCP on Mac. After conversion, you can play or edit XAVC S clips in Final Cut Pro without problem.

Additional Tips:

Besides converting XAVC S to FCP, this XAVC S Converter Mac also supports encoding XAVC/XAVC S file to various video formats like Apple InterMediate Codec for iMovie, MPEG-2 for Adobe Premiere Pro, DNxHD for Avid Media Composer, MOV for QuickTime player, etc.

Related Articles:

Import Panasonic VariCam 35 4K MXF to FCP without hassles

Tricks for Editing Panasonic GH4 4K footage in Final Cut Pro 7

Import & Edit Canon XC10 4K XF-AVC onto Davinci Resolve

Convert and Import Canon C500 4K MXF to DaVinci Resolve for Editing smoothly

Workflow for Panasonic GH4 4K MP4/MOV to Premiere Pro

Importing DJI Phantom 3 4K to Premiere Pro for smooth editing

How to Import & Edit Canon EOS C500 MXF files onto Premiere and Avid

Guide on Converting 4K to 1080p ProRes on Mac/Windows

Friday, January 8, 2016

Import Panasonic VariCam 35 4K MXF to FCP without hassles

Summary: In this article you can find the easiest way to transfer VariCam 35 4K raw MXF to ProRes MOV for FCP ,just learn how to transcode VariCam 35 4K raw MXF to ProRes MOV.


As a professional camcorder, Panasonic VariCam 35 has very powerful recording features, handling in multiple formats ranging from pristine 4K RAW to 4K, UHD, 2K, HD and ProRes capture formats making it an unparalleled tool for high-end filmmaking, commercials, episodic production and live 4K events. After recording amazing 4K footage with the Panasonic VariCam 35 camcorder, you may have the need to import Panasonic VariCam 35 4K Video to Final Cut Pro for further editing, then you'll definitely encounter various importing and editing issues. Why it happened? How can we do?

In fact, MXF video recorded by Panasonic VariCam 35, actually a container video format, is not compatible with Final Cut Pro(Even the newest FCP X), in addition the 4k file size is too big to handle with. In this case, the quick workaround is to convert Panasonic VariCam 35 files to native supported formats of Final Cut Pro, and then we can edit VariCam 35 files smoothly. Concerning the converting speed and video quality, here we recommend you to use Brorsoft 4k Video Converter for Mac.

With running it, you can effortlessly Panasonic VariCam 35 4K to FCP's ProRes with unprecedented encoding speed and unbelievable video quality. The 4K Video Converter for Mac also features transcode 4k MXF to DNxHD MOV,AVCHD/AVCHD 2.0 to ProRes MOV, AIC MOV, DVCPRO MOV for FCP, iMovie, FCE, QuickTime for viewing and playing. More than 250 output formats makes it is easy to convert MXF to AVI, MP4, MPEG, FLV, MKV, WMV, etc for different Media Players. If you work 4K files in Final Cut Pro on Windows PC, please get Brorsoft 4K Video Converter to solve the issues. Below is a simple tutorial to merge VariCam 35 4K clips to ProRes for Final Cut Pro editing. Let's take a look!

Download the 4K Video Converter for Mac

(Note: Click here for OS X 10.5)

How to import Panasonic VariCam 35 4K video into Final Cut Pro

Step 1. 1. Load 4K files

Add raw files > Run the program you just set up. Drag and drop the 4K video files to the converter. You can also hit Add files button to import videos to the app. If you wanna combine several videos into one file, you can click the "Merge into one" box.


Step 2. Choose ProRes as output format

Click the "Format" bar and select Final Cut Pro> Apple PreRes 422(*.mov) as output format.


Step 3. Adjust video, audio settings

Click the "Settings" button and customize proper video/audio parameters including Video size, bitrate and fame rate and mroe. Usually 1920*1080 video size and 30fps video frame rate are recommended for FCP editing. Well, if you prefer to work with 4K video, you can adjust video size to get 4K ProRes for FCP.

Step 4. Start conversion

After all necessary settings, hit the convert button to start the 4K video to ProRes conversion on Mac OS X. Once the conversion process shows in 100%, click Open to get the output videos. Create a project and start editing 4K video in FCP 6/7/X with light speed.

Related Guides:

Convert & Import Panasonic VariCam 35 4K to Premiere Pro for Editing

Working with Canon C300 Mark II 4K footage in Premiere Pro CC/CS6/CS5/CS4

Convert and Import Canon C500 4K MXF to DaVinci Resolve for Editing smoothly

Workflow for Panasonic GH4 4K MP4/MOV to Premiere Pro

Working with Panasonic HC-VX870K 4K Videos in iMovie

Panasonic HC-VX870K 4K Workflow with Avid Media Composer

Tuesday, January 5, 2016

Working with Canon XC10 4K MXF file in Avid Media Composer

Summary: This tutorial mainly teach you how to import Canon XC10 4K MXF footage into Avid Media Composer for further editing without hassle.


Deliver stunning 4K and Full HD videos, the Canon XC10 has attracted lots of users' attention. From Canon new camrea spec, we find it uses XF-AVC movie recording format, employs the MPEG-4 AVC/H.264 video compression format, and packages video in the widely supported MXF wrapper. However, when you want to have a project with the 4K MXF recordings from Canon XC10 in Avid Media Composer, some problems would occur: missing codec, looped audio, etc. If you are really want to edit Canon XC10 4K MXF in Avid Media Composer smoothly, read on this passage to learn more details.

The basic reason is that MXF is a self-container format; it is not an ideal editing format for NLE system including Avid Media Composer. To help XC10 owners get rid of this trouble, I will show you the easiest and quickest way to convert Canon XC10 MXF files to DNxHD for editing in Avid Media Composer smoothly. In order to finish the task, here I strongly recommend you try Brorsoft MXF video converter for Mac.

After applying it, you can effortlessly transcode Canon MXF files to Avid Media Composer highly compatible DNxHD encoded MOV from XC10 as well as C500, C300, XF305, XF100, XF300... without quality loss. It can generates best editing format/codec for filmmakers and video enthusiasts to use in different NLE apps, such as Avid Media Composer 5/5.5/6/6.5/7, Adobe Premiere Pro CS4/CS5/CS6/CC7, Adobe After Effects, iMovie, Final Cut Express, Final Cut Pro 6/7/X, and more. If you're using a Windows PC, please turn to the Windows version, which has the same function as the Mac program.

Converting Canon XC10 MXF files to Avid Media Composer 5/5.5/6/6.5/7

Step 1. Add Canon MXF footage to the Canon MXF Converter.

Run the top-rated MXF to MOV Converter. Click "Add" to load the source Canon MXF files. When the Canon MXF files are loaded to the MXF Converter, you can view the videos from the Preview window.


Step 2. Set Avid DNxHD MOV as output format.

Click on "Format", and select output format from the drop-down list. Follow "Avid Media Composer" > Avid DHxHD (*.mov)".


Step 3. Adjust video resolution, bit rate, frame rate, etc.

Click "Settings" button if you'd like to customize advanced audio and video parameters like Video Codec, aspect ratio, bit rate, frame rate, Audio codec, sample rate, audio channels.


Step 4: Start converting MXF to Avid MC

Click "Convert" button and the Canon XC10 MXF files will be converted to Avid DNxHD MOV immediately. Soon after the conversion, just click "Open" button to get the generated files for edit in Avid Media Composer perfectly.


Friday, January 1, 2016

Convert & Import Panasonic VariCam 35 4K to Premiere Pro for Editing

Summary: Have trouble of importing Panasonic VariCam 35 4K files to Premiere Pro CS6/CS5/CS4/CC, don't worry, read on this post and get your annoying issues fixed.


I bought a Panasonic Varicam 35 camcorder not long before, it looks awesome just like in the picture. After shooting a bunch of amazing 4K footage, I just intented to import those 4K videos into my Premiere Pro CS 6 for doing some modifications, but later lots of issues came to me. The error message "ERROR COMPILING MOVIE: UNKNOWN" popped up constantly whenever importing 4K videos recorded from the Panasonic Varicam 35 camcorder.

It nearly made me crazy, then doing some seraches on the Google, I figured out the videos recorded by Panasonic VariCam 35 are not compatible with Premiere Pro, and the optimal suggestion I recived is to convert those 4K meidas to Premiere Pro more edit-friendly video format MPEG-2 initially with the help of a third party program. As I was confusing which application is worth to choose, when a friend recommended the Brorsoft 4K Video Converter for Mac to me. Thanks God, it works! Importing and editing VariCam 35 4K video files in Premiere Pro without rendering time is really fast. The crucial point is I appreciate the output quality.

The 4K Video Converter for Mac also has the ability to encode/re-encode 4k H.264(MP4), XAVC, XAVC S, etc footage for smoothly importing and editing in various non-linear editing systems (NLE), including Adobe Premiere Pro, Avid Media Composer, Final Cut Pro, iMovie, FCE and more. If you work 4K files in Adobe Premiere Pro on Windows PC, please get Brorsoft Video Converter to solve the issues. Below is a simple tutorial to merge VariCam 35 4K clips to MPEG-2 for Premiere Pro editing.Let's take a look!

Download the 4K Video Converter for Mac

(Note: Click here for OS X 10.5)

How to import Panasonic VariCam 35 4K video into Adobe Premiere Pro

Step 1. Add raw files > Run the program you just set up. Drag and drop the 4K video files to the converter. You can also hit Add files button to import videos to the app. If you wanna combine several videos into one file, you can click the "Merge into one" box.


Step 2. Choose output format > Click "Format" bar and choose Adobe Premiere/Sony Vegas -> MPEG-2(*.mpg) as output format for editing raw 4K in Adobe with natively supported video codec.


Step 3. Advanced V/A settings > Click "Settings" button if you'd like to customize advanced audio and video parameters like Video Codec, aspect ratio, bit rate, frame rate, Audio codec, sample rate, audio channels. Note: If you want to get original 4K resolution, just keep the video size as original.


Step 4. Start converting 4K footage > Hit the convert button of the best 4K Video Converter. It will start converting 4K for importing to Adobe Premiere Pro immediately. Soon after the conversion, just click "Open" button to get the generated files for natively editing in Premiere Pro CC7/CS6 as well as CS5/CS4/CS3 perfectly.

Related Articles:

Working with Canon C300 Mark II 4K footage in Premiere Pro CC/CS6/CS5/CS4

Convert and Import Canon C500 4K MXF to DaVinci Resolve for Editing smoothly

Workflow for Panasonic GH4 4K MP4/MOV to Premiere Pro

Working with Panasonic HC-VX870K 4K Videos in iMovie

Panasonic HC-VX870K 4K Workflow with Avid Media Composer