Tuesday, December 29, 2015

Working with Canon C300 Mark II 4K footage in Premiere Pro CC/CS6/CS5/CS4

“I just received my Canon C300 Mark II and was eager to import its XF-AVC 4K MXF to Premiere Pro for editing. I ignored the negative comments I saw on the Web about importing into some editing software but since I have Premiere Pro CC/CS6/CS5, I figured that I’d be okay. Guess what? Premiere Pro CC/CS6/CS5 does not recognize XF-AVC 4K MXF captured by Canon C300 Mark II . I get an error statement.”


Designed to deliver stunning 4K and Full HD video. the Canon C300 Mark II provides the innovative new features like the Canon XF-AVC codec for 4K and HD recording. The range features XF-AVC intra for 4K, and XF-AVC Long GOP and Proxy options for 2K/Full HD recording, both of which utilise H.264 codec, offering post production flexibility and ease of use.

In fact, the video recorded by Canon XC10 is packed in the widely supported MXF wrapper using the XF-AVC codec. But the MXF, as a container format, consist of different codecs and not all codecs are friendly with Premiere Pro, so you may always encounter incompatible issues whenever importing Canon C300 4K MXF videos into Premiere Pro. And from Adobe Premiere Pro supported file formats list, we can find Premiere supports MPEG-2 perfectly. In this case, to get Premiere Pro working with Canon C300 XF-AVC MXF files, the easy workaround is to transcode them to MPEG-2 initially.

Overall, Brorsoft MXF Converter for Mac is the best choice to get the work done. The program is an easy-to-use yet professional app which can be used as a MXF to Premiere Pro Converter under Mac OS X(Yosemite and El Capitan included). With it, you can effortlessly transcode MXF to edit in Premiere Pro, Avid Media Composer, Premiere Elements, Final Cut Pro, iMovie and more NLEs without problems. If you are running a Windows computer, please turn to the alternative Windows version - MXF Converter. Below is how. Just take a look at the brief guide below.

How to Convert Canon C300 Mark II 4K XF-AVC MXF to Premiere Pro for smooth editing

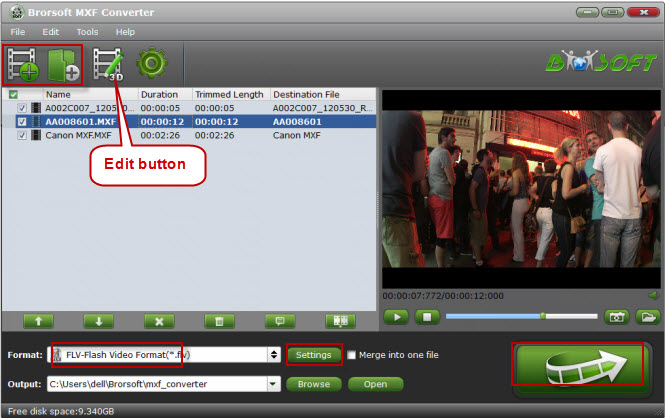
Step 1. Install and launch the MXF converting program on your Mac. Click "Add" button to load the source MXF files. (Or you can drag & drop the MXF files to the software's window list.)

Tip: You can click the button "Merge into one" to combine MXF clips to one file.


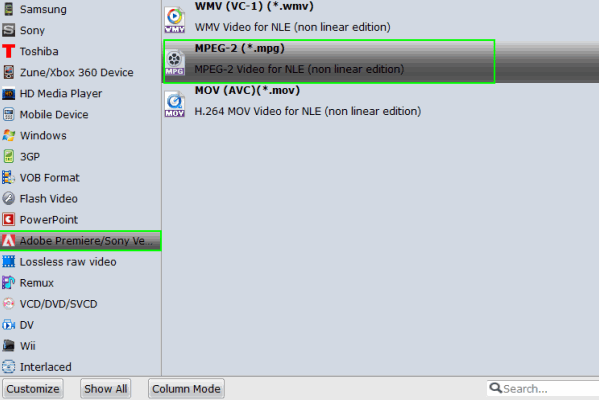
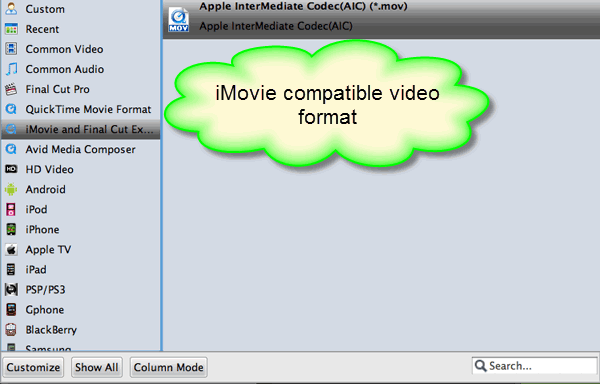
Step 2. Choose output format. This video converter offers optimized format preset for Adobe Premiere. Just click "Format" menu firstly and then follow "Adobe Premiere/Sony Vegas" to set MPG, MOV or WMV format.


Tip: You can click "Settings" button to adjust output parameters as you want, such as resolution, bitrate, etc.

Step 3. Click Convert button to start transcoding Canon C300 MKII 4K MXF to MPEG-2 for Premiere Pro on Mac OS X.

Once the conversion completes, you can click "Open" to find the .MPG videos which can be imported to Premiere Pro CC/CS6/CS5/CS4 directly. You've done.

Additional Tips:

1. While importing MXF clips into the program for conversion, please make sure you have the entire MXF file structure as it saved on your camcorder (like a P2 Card). If you only have some loose .MXF clips, you files will have image only without audio.

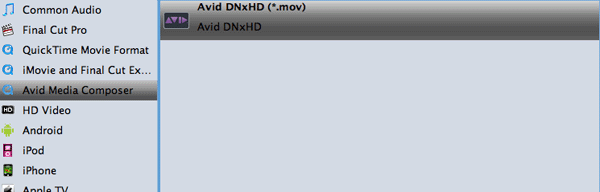
2. This versatile MXF to Premiere Elements Converter can also export optimal formats for Avid MC, FCP, iMovie, etc editing programs. If you want to edit MXF media in Final Cut Pro, please choose the "Final Cut Pro > Apple ProRes 422 (*.mov)" as output; For iMovie or FCE, choose the "iMovie and Final Cut Express -> Apple InterMediate Codec (AIC) (*.mov)". For Avid MC, choose "Avid Media Composer > Avid DNxHD(*.mov)" as output format.

Related Guides:

Convert and Import Canon C500 4K MXF to DaVinci Resolve for Editing smoothly

Workflow for Panasonic GH4 4K MP4/MOV to Premiere Pro

Working with Panasonic HC-VX870K 4K Videos in iMovie

Panasonic HC-VX870K 4K Workflow with Avid Media Composer

Saturday, December 26, 2015

Convert and Import Canon C500 4K MXF to DaVinci Resolve for Editing smoothly

Summary: There are some useful tips and tricks for playing and editing Canon C500 4K MXF footage on DaVinci Resolve freely.


Canon EOS C500 4K Digital Cinema Camera offers a Super 35mm, 8.85-megapixel CMOS image sensor, DIGIC DV III Image Processor and an expansive range of recording and output options specifically for 4K and 2K image acquisition. It can record super high resolution (4096×2160 pixels) videos in MXF format which are seldom seen in the market. Other resolutions such as 2048*1080 and 1920*1080 are also selectable with this C500.

While Canon C500 MXF recordings brings better quality and convenient for broadcasting, but most users usually occurred some error messages when they import C500 4K MXF clips into DaVinci Resolve. That's because MXF as a container format, still can not be supported well by many video editing programs like Davinci Resolve and it also would be a bit hard to handle with 4K video. So if you are using DaVinci Resolve for editing just like me, the best workaround for us is to convert Canon C500 MXF to DNxHD encoded MOV, which is the most compatible format for DaVinci Resolve, and it will make the editing work much smooth and easier. In order to finish the task, Brorsoft MXF Converter is just a great choice.

Overall, it is an easy-to-use yet powerful high-quality MXF converter, player and editor. This software can deal with almost all kinds of MXF videos. With it, users can effortlessly transcode 4K MXF files for smoothly editing in DaVinci Resolve. What's more, it can generates more optimal editing formats/codecs for you to use in different NLE apps, such as Adobe After Effects, Adobe Premiere Pro, Sony Vegas Pro, Pinnacle Studio, Windows Movie Maker and more. Below is how. Just take a look at the brief guide below.

Free download the MXF to DaVinci Resolve Converter:


Guide: Convert MXF videos to DaVinci Resolve acceptable format

1. Import MXF files

Run the Best MXF Coverer; click the Add button to load .mxf files to the program from your computer or camcorder. You can also directly drag the video files into the program directly.


2. Choose output format

Click Format preset[and]choose Avid Media Composer -> Avid DNxHD (*.mov)” as the best video format for editing Sony XAVC in Avid as well as good video quality.


Tip: If you like, adjust video and audio parameters, including the Bitrate of Video[and]Audio, the Codec of Video[and]Audio, Video Size, Sample Rate, Frame Rate, Audio Channels, etc., by clicking the Settings button on the main interface for getting the best quality.

3. Start conversion

Hit "Convert" button to start MXF to DNxHD .mov conversion for Davinci Resolve. You can follow the conversion process from the pop-up windows.

After the conversion, you can import the converted MXF files to Davinci Resolve 10/11/12 for smooth playback and editing. No more worries about the MXF incompatibility with DaVinci Resolve.

Related Guides:

Panasonic HC-VX870K 4K Workflow with Avid Media Composer

Working with Panasonic HC-VX870K 4K Videos in iMovie

Wednesday, December 23, 2015

Workflow for Panasonic GH4 4K MP4/MOV to Premiere Pro

Summary: This is an instructional guide on how to import and edit Panasonic GH4 4K MP4/MOV footage on Adobe Premiere Pro without any hassles.


As the world's first DSLM with 4K cinematic recording capability, the Panasonic LUMIX DMC-GH4 can capture either Quad HD (3840 x 2160) at up to 29.97p or 'Cinema 4K' (4096 x 2160) at up to 24p and it can store that footage at a 100Mbps bitrate using IPB compression in an MP4 or MOV container format. Above all, the 4K footage recorded from Panasonic GH4 just looks amazing and stunning. If you are a photography enthusiasts, you won't miss it! However, currently 4K footage is not widely supported yet, so few video software including Premiere Pro can handle it perfectly. Then you may wonder what's the available way to edit GH4 4K in Adobe Premiere Pro smoothly?

As you see, Panasonic GH4 captures 4K videos in MP4, MOV format. But the problem is, H.264 MP4/MOV file format from Panasonic GH4 is beyond the compatibility of Adobe Premiere Pro. Something else, Premiere Pro CS6, CC 7 can (usually) handle 4K files without much problem, but it is extremely hardware intensive. In most cases, editing 4K in Premiere Pro CC/CS6/CS5 is very taxing on your computer. In order to work Panasonic GH4 4K footage in Adobe Premiere smoothly, a better way is to transcode Panasonic GH4 4K to a more “edit” friendly codec and 1080p would be the best settings.

Actually, it's not as difficult as you imagine. What's need is just a common video converter like Brorsoft Video Converter for Mac. Overall, this video conversion program can effortlessly encode/re-encode 4K H.264(MP4/MOV), XAVC, XAVC S, etc footage for smoothly importing and editing in various non-linear editing systems (NLE), including Adobe Premiere Pro, Avid Media Composer, Final Cut Pro, iMovie, FCE and more. If you work 4K files in Adobe Premiere Pro on Windows PC, please turn to 4K Video Converter to solve the issues. Now just download it and follow the step-by-step guide to learn how to work GH4 4K videos with your editing software smoothly. Keep reading for a brief how-to on each process.


Quick Tutorial on how to convert GH4 4K footage for editing in Premiere Pro

Step 1. load GH4 4K videos

Run the program you just set up. Drag and drop the 4K video files to the converter. You can also hit Add files button to import videos to the app. If you wanna combine several videos into one file, you can click the "Merge into one" box.


Step 2. Choose output format

Click "Format" bar and choose Adobe Premiere/Sony Vegas -> MPEG-2(*.mpg) as output format for editing Panasonic GH4 4K in Adobe Premiere Pro with natively supported video codec.


Tips: Click "Settings" button if you'd like to customize advanced audio and video parameters like Video Codec, aspect ratio, bit rate, frame rate, Audio codec, sample rate, audio channels. Note: If you want to get original 4K resolution, just keep the video size as original.

Step 3. Start converting 4K footage to Premiere

Hit the convert button of the best 4K Video Converter. It will start converting 4K for importing to Adobe Premiere Pro immediately. Soon after the conversion, just click "Open" button to get the generated files for natively editing Panasonic GH4 4K video in Premiere Pro CC7/CS6 as well as CS5/CS4/CS3 perfectly.

Related Guides:

Panasonic HC-VX870K 4K Workflow with Avid Media Composer

Working with Panasonic HC-VX870K 4K Videos in iMovie

Saturday, December 19, 2015

Working with Panasonic HC-VX870K 4K Videos in iMovie

Summary: Read this thread to learn a smooth workflow guide for importing Panasonic HC-VX870K 4K MP4/AVCHD footage to iMovie.


The HC-VX870 is the second model down in Panasonic's new 4K camcorder range after the HC-WX970. It shoots 4K video (in MP4, MOV format) at 8 megapixels (3840 x 2160) per frame, vs. 2 megapixels (1920 x 1080) of Full HD. If you recorded some videos by Panasonic HC-VX870K, you may like editing the 4K videos in iMovie.

“Hi, there, I purchased a Panasonic HC-VX870K a few weeks ago. I have recorded some 4K files with it. Unfortunately, iMovie can not work with 4K recordings stably. Does anyone know a smooth workflow for HC-VX870K 4K and iMovie? Thanks for any advice.”

As you see, iMovie doesn't seem to open and import Panasonic HC-VX870K 4K footage correctly. Question is, what's causing the issues? According to my experience, it may due to the high video resolution and the video codec incompatibility. Since Apple InterMediate Codec is the best editing video codec for iMovie, so we can convert Panasonic HC-VX870K 4K video to AIC .mov (1080p would be the best settings.) with a top 4K Video Converter, which will save you both time and trouble, and all you need is to drag the result videos for prompt editing.

Here Brorsoft 4K Video Converter for Mac is highly recommended. Developed with the most advanced converting technology, this 4K video converter is capable of outputting Panasonic HC-VX870K 4K MP4/AVCHD to iMovie best suitable editing codec - AIC.mov with very good quality and super fast conversion speed. As a professional video editing codec producer, you can also use our application to encode HC-VX870K 4K MP4/AVCHD to other professional editing codec such as Apple Prores Codec for FCP 6/7/X, DNxHD for Avid Media Composer, MPEG-2 for Sony Vegas/Premiere Pro CC/Premiere Elements/After Effects to meet your diverse demands.


(Note: Click here for OS X 10.5.8)

Converting Panasonic HC-VX870K 4K video to work in iMovie 8/9/11

Step 1: Load the 4K videos to the program

Download and install the 4K Video Converter, and then import the source 4K videos to it. To do so, you can directly drag & drop the files onto the main interface, or you can click the "Add" icon to locate the videos from your local disk. Note that batch conversion is supported, so you can add several files to the converter at one time.


Step 2: Set output video format

Click the Format column to select output format "iMovie and Final Cut Express > Apple Intermediate Codec(AIC) (*.mov)" as the best compatible video format for editing 4K in iMovie.


Tips: Hit the Settings icon, start to adjust the video and audio parameters, including the Bitrate of Video&Audio, Video Size, Sample Rate, Frame Rate, Audio Channels, etc.


Step 3: Begin to convert 4K videos to iMovie

When you finish the settings, you can press the big "Convert" button to kick off the conversion. By using future-proof technology, the conversion will be finished with ultra fast speed and the best video quality kept. After the conversion, you can then edit the 4K videos in iMovie smoothly.

Related Guides:

Panasonic HC-VX870K 4K Workflow with Avid Media Composer
Importing DJI Phantom 3 4K to Final Cut Pro for further editing

How to Import Zenmuse X5/X5R 4K Videos to Final Cut Pro

How to Import Sony HXR-NX100 XAVC S to Final Cut Pro X/7

Wednesday, December 16, 2015

Panasonic HC-VX870K 4K Workflow with Avid Media Composer

"I just bought a Panasonic HC-VX870K 4K compatible camera. I shot some footage the other day and have had trouble importing that into Media Composer 8.3. Does anyone know how to rectify this problem - perhaps I need a plug-in? A detailed step by step would be greatly appreciated."


The Panasonic HC-VX870 is a digital camcorder with a high-quality sensor designed for 4K resolution video capturing. It offers us a wide choice for video recording format in MOV, MP4 and AVCHD. If you have shot some amazing 4K footage from the Panasonic HC-VX870K camera and want to import them into Avid Media Composer for further editing, you'll disappointed to find those Ultra HD video files are not recognized by Avid Media Composer. So, how to ingest Panasonic HC-VX870K 4K MP4, MOV or AVCHD footage to Avid Media Composer? Is there a software can do the job?

In fact, Avid Media Composer has the capability to ingest 4K media, however, to have a smooth workflow of 4K video in Avid Media Composer, there are many things you should consider: strong computer processing power, high speed disk arrays. In addition, you must have Avid Media Composer 8.3 or higher to deal with 4K video. To simplify the editing workflow, you can compress 4K MP4/MOV to 1080p, which will ensure a faster and smoother editing workflow. As for editing AVCHD video with Avid Media Composer, since AVCHD is not the native editing format for Avid Media Composer, you will need to decode AVCHD to Avid Media Composer best compatible editing format DNxHD for fluent workflow.

To address all above mentioned video codec incompatible issues, you are recommended to take advantage of Brorsoft Mac UHD 4K video converter. With it, you can effortlessly transcode Panasonic HC-VX870 4K video to various non-linear editing systems (NLE), including Avid Media Composer, Final Cut Pro, Adobe Premiere Pro, iMovie, Final Cut Express, and more. And there is no need to worry about the quality loss. This Ultra HD Video Converter is also available to customize the output resolutions to any size the users want. Just download it and follow the tutorial below to get the work done.

Free Download UHD 4K Video Converter:


(Note: Click here for OS X 10.5)


Converting Panasonic HC-VX870K 4K footage to Avid Media Composer compatible video

Step 1. Launch the 4K file converter and click add button to import Panasonic 4k clips to the program for converting.


Step 2. Click "Format" bar to select Avid Media Composer->Avid DNxHD(*.mov) as output format.


Step 3. Click the Settings button; you can recommended to set the video size, bit rate, fame rate, etc. Here you are recommended to set the video size as 1920*1080 since

Avid Media Composer can't support raw 4K video well.


Step 4. Hit the Convert button to start the conversion; it will convert Panasonic HC-VX870K 4K footage to Avid Meida Composer friendly format on Mac OS X.

After the conversion, click the Open button to get the converted Panasonic HC-VX870K 4K videos for further editing with Avid Media Composer smoothly.

Related Guides:

How to Import Sony HXR-NX100 XAVC S to Final Cut Pro X/7

Work Sony XDCAM PXW-X180 XAVC/MXF into Final Cut Pro 6/7/X

How to Import Zenmuse X5/X5R 4K Videos to Final Cut Pro

Simple Way to Import Samsung NX1 4K H.265 Videos to Final Cut Pro

Importing DJI Phantom 3 4K to Final Cut Pro for further editing