Wednesday, April 27, 2016

Import 4K MP4/MOV from DJI Phantom 4 to Edit in iMovie

Summary: Have recorded some stunning 4K footage via DJI Phantom 4? Want to import and edit them in iMovie? Read on this post to get the smooth workflow of DJI Phantom 4 4K MOV/MP4 clips and iMvoie.


DJI Phantom 4 is a slick, feature-packed drone that gives you the ability to capture DCI-spec 4K (4096 x 2160) at 24 or 25 fps and UHD 4K (3840 x 2160) at up to 30 fps whether for cinematography or just shooting for fun. However, it records 4K video in MP4 or MOV with MPEG-4 AVC / H.264 codec, which is not a native editing codec for most NLEs including iMovie. So if you try to import and edit DJI Phantom 4 4K footage into iMovie, you're likely to run across various issues: screen freezes, program crashes, no audio, etc. Then there is any fluid workflow of transferring and editing DJI Phantom 4 4K videos in iMovie? Read on to get more hints:

Best 4K video formats and resolution for editing with iMovie on Mac

Resolution: 1080P

Generally the common personal computer doesn’t have the ability to process the Phantom 4 4K video editing work, even if you can import Phantom 4 4K footage into iMovie on Mac. The quality of Phantom 4 4K videos is ultra high definition, so it requires very powerful computer hardware for smoothly editing. In short, for the purpose of better and smoother editing, you're advised to compress 4K to 1080p.

Format: Apple Intermediate Codec

The H.264 codec is not good for video editing as we mentioned above. Even with high computer Configuration with a hard disk array, you will encounter performance issues if your source 4K video is in H.264 codec. AIC is the most compatible format for iMovie.

The best way to convert and downscale DJI Phantom 4 4K videos to iMovie

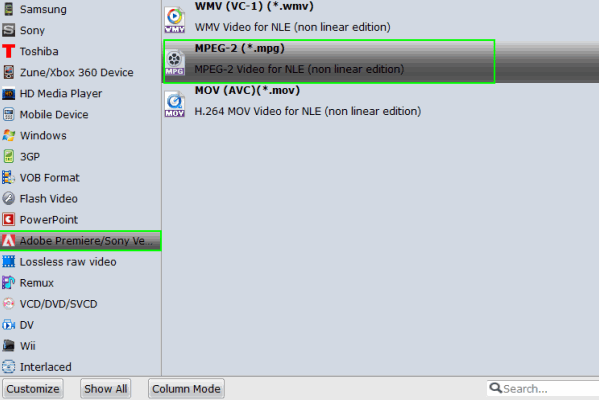
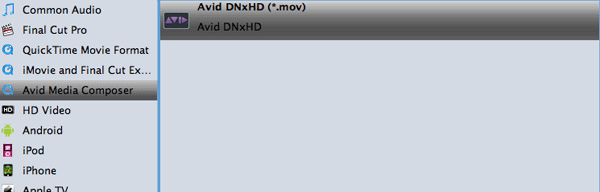
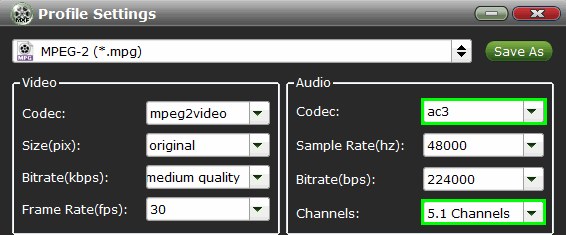
In conclusion, you need a professional video converter to help you convert the original DJI Phantom 4 4K videos to Apple Intermediate codec and downscale 4K videos to 1080P. Brorsoft Video Converter for Mac is the best one recommended to you. It is a professional tool that can deal with DJI Phantom 4 videos regardless in 4K, 2K or HD to AIC .mov for iMovie editing without quality loss. Plus, other optimal presets like ProRes for FCP, DNxHD for Avid Media Composer , MPEG-2 for Adobe Premiere Pro are provided. Now follow the below guide to convert DJI Phantom 4 4K MP4/MOV for playing and editing in iMovie.

Download the 4K to iMovie converter:

(Note: Click here for OS X 10.5)

Best Way to import DJI Phantom 4 4K files to iMovie natively

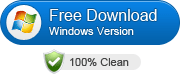
Step 1: Load DJI Phantom 4 4K videos

Run DJI Phantom 4 4K to iMovie Converter and load 4K MP4 clips to it by clicking “Add” button. You can also drag and drop the 4K files to the software directly from your Hard drive.


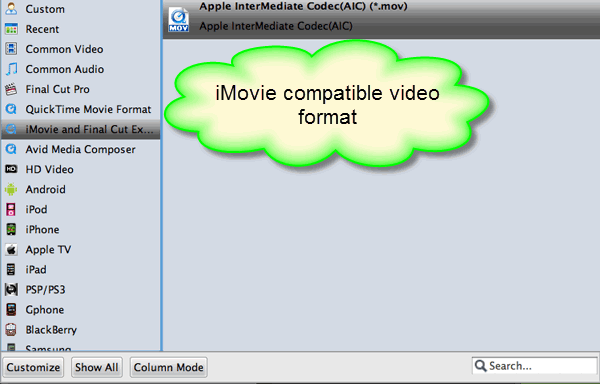
Step 2: Select output format you want

Hit the “Format” bar and select iMovie and Final Cut Express > Apple InterMediate Codec(*.mov) as output format on the drop-down menu.


Tip: You can also click “Settings” to fix the frame rate, bitrate, video size, etc to your needs, that you can play and edit DJI Phantom 4 4K movies in iMoive easily. Generally, 1080p video size is good for iMoive editing. Of course, it can keep original 4K resolution for you if you need.

Step 3: Convert DJI Phantom 4 4K to iMovie

Click the convert button under the preview window; the converter will start encoding DJI Phantom 4 4K clips for iMovie.

After the conversion, click the “Open” button to locate converted files, and then you can load the converted DJI Phantom 4 4K files into iMovie for editing smoothly with the best quality.

More Topics:

Import DJI Phantom 4 4K MOV/MP4 footage to FCP for further editing

Import and Edit 4K footage recorded from DJI Phantom 4 onto Premiere Pro

Get DJI Phantom 3 4K footage work well with Avid Media Composer

Wednesday, April 20, 2016

How to Import and Edit Sony Action Cam footage in Premiere Pro

Summary: Have shot some stunning 4K XAVC S/MP4 footage from Sony Action Cams like X1000V, HDR-AS100V, HDR-AS50, etc, but got trouble of editing them in Premiere Pro? No fret! This article aims to show you a smooth workflow of importing and editing Sony Action Cam recordings in Premiere Pro. Keep reading on...


Once you are thinking of a Sony Action Cam, FDR-X1000V, HDR-AS100V, HDR-AS200V, etc may occurs to your mind instantaneously. All of them are featured with outstanding image quality, remote recording ability, and portable character, definitely sport photographers' choice. If you own a Sony Action Cam, you can find it uses MPEG-4 AVC/H.264 video codec and MP4 or XAVC S video mode. However, if you attempt to import those MP4/XAVC S footage into Premiere Pro or other editing software for making some modifications, the result mat lets you down: program cashes, no audio, the file can't be recognized, etc. What's the matter? Is there any available workflow? Reading on...

Based on our multiple testing, we come to find that no matter MP4 or XAVC S both beyond Premiere Pro compatible ablity. In addition, for Premiere Pro, handling 4K videos is taxing and extremely hardware intensive. Under this circumstance, in order to enable the 4K/HD XAVC S/MP4 clips from Sony Action Cam editable with Premiere Pro, you'd better transmute them into Premiere Pro editing-friendly format like MPEG-2 initially.

To accomplish the mission, you are highly recommended to adopt the professional yet easy-to-use Brorsoft Video Converter for Mac. With its help, you can effortlessly transcode XAVC S/MP4 footage from Sony Action Cam to Premiere Pro friendly MPEG-2 format with excellent output quality. Besides, it also enables you to transcode Sony Action Cam footage to Final Cut Pro, iMovie, Avid Media Composer, After Effect, etc NLEs catering for your diverse demands. More than that, it comes with all regular video editing tools like Trim, Crop, Effect, Subtitle, Watermark. For basic video editing tasks, you can even replace your Premiere Pro with it. If you work Sony ActionCam files in Adobe Premiere Pro on Windows, please get Brorsoft Video Converter to solve the issues.

(Note: Click here for OS X 10.5)

Sony ActionCam XAVC S/MP4 and Premiere Pro Best Workflow

Step 1: Install and launch the Sony XAVC S/MP4 converter for Mac and click the “Add” button to load source files for converting. Check the “Merge into one” box, you can join several XAVC S/MP4 clips together.


Step 2: Choose output format > Click "Format" bar and choose Adobe Premiere/Sony Vegas -> MPEG-2(*.mpg) as output format for editing raw 4K in Adobe with natively supported video codec.


Tip: Before the conversion, you can also perform the following operations with the help of this powerful Video Converter: trim large video files into small video segments; adjust video brightness, contrast, saturation and change video effect as a whole. Note: For gaining smooth workflow, you're suggested to compress 4K to 1080p videos. But if you stick to getting original 4K resolution, just keep the video size as original.

Step 3. Start the conversion

Now click the "Convert" button, and then leave the Mac Video Converter to do the rest automatically for you. After the Sony Action Cam to Premiere Pro Mac conversion, you can freely use your Sony Action Cam files on Premiere Pro CC7/CS6 as well as CS5/CS4/CS3 perfectly.

Tip: To import videos to Premiere Pro, you can:

1. Go to "File"> "import">"movies"

2. Drag media file directly to the left zone in the Premiere Pro main interface.

More Articles:

Import & Edit Sony FDR-AX53 XAVC S footage in Premiere Pro

How to Import and Edit Sony A6300 XAVC S footage in Premiere Pro

How to Work with Sony Action Cam Footage in Sony Vegas

Wednesday, April 13, 2016

Import & Edit Sony A6300 4K/1080p XAVC S with Avid Media Composer

Summary: If you run across issues of working Sony A6300 XAVC S files with Avid Media Composer, you won't miss this post. It demonstrates a terrific workaround to transcode a6300 4K/1080p XAVC S video to DNxHD.mov format for editing in Avid Media Composer smoothly.


With advanced, reliable, easy-to-use functions in a robust magnesium alloy body, the α6300 rises to new heights of professional-class performance. The camera supports 4K recording with high-bitrate XAVC S format at 24p, 25p and 30p and full 120fps high-speed shooting at up to 100Mbps bit rate to capture detailed movies with minimal compression noise. On the other hand, if you own the splendid professional video editing app Avid Media Composer, chances are you want to enhance your XAVC S video in Avid before uploading to YouTube or posting on Facebook, while unfortunately find it a painful experience as below:

“Hi, all, can you guys work with XAVC S recordings from Sony a6300 in Avid? I have a bundle of 4K XAVC S files shot on a6300, which I would like to edit in Avid MC. Unfortunately, there isn’t an available AMA plugin for XAVC S, so I can’t import XAVC-S file format. I would like to know if there are any workarounds to go through this issue. Please help. Thanks for any help.”

Granted that, for a faster and more fluid workflow, Sony has created a special free charge AMA plug-in for Avid. However, this software for Microsoft Windows and Mac OS X operating systems only provides support for XAVC files in Avid Media Composer. As for 4K XAVC S, it is not currently supported natively by Avid Media Composer. Luckily, there is still another easier way to fix such troubles, namely converting XVAC S to DNxHD, a codec specially developed by Avid to help media professionals to work with mastering-quality HD media at significantly reduced file size.

To complete this task, you are highly recommended to adopt Brorsoft Video Converter for Mac. With it, you can convert any XAVC S files recorded from Sony a7S, Sony AX100, AS100V and more to Avid Media Composer preferable DNxHD video with splendid output quality. Apart from Avid Media Composer, this XAVC converter can also support Sony A6300 4K/1080p XAVC S clips for editing in Adobe Premiere Pro, Final Cut Pro, iMovie, etc flawlessly. The equivalent Windows version is Brorsoft Video Converter, which can encode Sony A6300 4K/1080p XAVC S files for Windows editing.

(Note: Click here for OS X 10.5)


Transcode Sony A6300 4K/1080p XAVC S to DNxHD for Avid MC editing

Step 1. Install and launch XAVC S to DNxHD Converter, and then click "Add" button to load XAVC S files or directly drag the footage to the program.


Step 2. You just need to go to "Avid Media Composer -> DNxHD (*.mov)" as the best video format for editing XAVC S in Avid with good video quality.


Step 3. If the default settings do not fit you requirement, you can click "Settings" icon to and enter "Profile Settings" panel to adjust video size, bit rate, frame rate, sample rate and audio channels. For original 4K XAVC S files, if don't stick with 4K, you're suggested to download 4K to 1080p for easier editing.

Step 4: When ready, click ‘Convert’ to start format conversion. As soon as the conversion is complete, you can click ‘Open’ button to get the exported DNxHD MOV files for use in Avid apps with optimum performance.

More articles:

How to Import and Edit Sony A6300 XAVC S footage in Premiere Pro

A7R II 4K work with Movie Maker - Editing Sony A7R Mark II XAVC S files in Windows Movie Maker

Enable XAVC files recorded from Sony FS7 work with Davinci Resolve

Wednesday, April 6, 2016

How to Import DVD to Premiere Pro for further editing

Summary: Want to edit DVD in Premiere Pro with smooth workflow? The best solution is to rip and convert DVD to MPEG-2, the most compatible video format with Premiere Pro.

 
DVD, as all kinds of optical media, has becoming more and more popular in our daily life. Whether it's for a wedding video, a sport highlight film, or some other projects, more and more people have their video footage on DVDs these days. On the other hand, there must be some occasions when you want to edit your favorite DVD movies to make some modifications by Adobe Premiere Pro for its amazing editing capacity. While though Adobe Premiere supports lots of video and audio formats, such as 3GP, 3G2, ASF, DV-AVI, DV, FLV/F4V, M4V, MOV, MP4, MPEG, MPE, MPG, WMV, etc, DVD is excluded in this list. In order to enable DVD work with Premiere Pro successfully, here are two solutions provided for you!

Solution 1: Put the DVD into your computer player, open the DVD in Explorer, copy the folder Video_TS to your computer. Open the folder and rename all the files with the extension VOB to MPG. That's it. Premiere Pro will now import them.

Important note: This way seems to work only for non-protected DVDs. If you have some comerical DVDs, you may switch to the next solution.

Solution 2: The alternative trick is to rip the video contents out of the DVD disc and convert them to a Premiere Pro more edit-friendly video format like MPEG-2, which ensures teh maximum editing efficiency and quality when working with Premiere Pro.

The current software options for ripping a DVD movie to Adobe Premiere Pro are virtually endless. The most used software for us is Brorsoft DVD Ripper. As a Windows friendly program, its user-friendly interface and powerful capacity is suitable for both novice and pro alike Windows users. You can choose to rip one title or the entire DVD to MPEG-2 favored by Premiere Pro on Windows(Windows10 included). Plus, you can also trim, crop, add effect and merge files. This excellent DVD to Premiere Converter allows you to customize resolution, frame rate, bit rate for video, you can just keep the highest setting to get the ideal output effect. A good news is that it has its equivalent version for Mac users - DVD Ripper for Mac to extract DVD content and backup on your Mac.

How to Rip DVD movies to Premiere Pro with ease

Step 1. Load DVD movies

After downloading, install and run the program. As you can see, you can add the DVD movies you want to rip by clicking the “DVD disc” button on the main interface.


Step 2. Choose output format

Hit the Format box and select Adobe Premiere/Sony Vegas –> MPEG-2(*.mpg) as output format and then set the output destination as you want.


Tips: Adjust video and audio parameters if you need, including the Bitrate of Video and Audio, the Codec of Video and Audio, Video Size, Sample Rate, Frame Rate, Audio Channels, etc., in the Profile Settings Our recommendation of the settings is shown on the screen shot.


Step 3. Start converting DVD to Adobe Premiere

Finally, click Convert button to begin the DVD to MPEG-2 ripping. After the conversion finished, you can get the videos highly compatible with Adobe Premiere Pro CS3/CS4/CS5/CS6. Just launch Adobe Premiere Pro and import the converted videos to it and enjoy editing.

Related articles:

How to Transfer DVD to iMovie on Mac OS X

Tutorial on Ripping and Importing Blu-ray to Sony Vegas Pro 13/12/11/10

How to Rip and Convert DVD to Final Cut Pro X/7/6 freely