
Once you are thinking of a Sony Action Cam, FDR-X1000V, HDR-AS100V, HDR-AS200V, etc may occurs to your mind instantaneously. All of them are featured with outstanding image quality, remote recording ability, and portable character, definitely sport photographers' choice. If you own a Sony Action Cam, you can find it uses MPEG-4 AVC/H.264 video codec and MP4 or XAVC S video mode. However, if you attempt to import those MP4/XAVC S footage into Premiere Pro or other editing software for making some modifications, the result mat lets you down: program cashes, no audio, the file can't be recognized, etc. What's the matter? Is there any available workflow? Reading on...
Based on our multiple testing, we come to find that no matter MP4 or XAVC S both beyond Premiere Pro compatible ablity. In addition, for Premiere Pro, handling 4K videos is taxing and extremely hardware intensive. Under this circumstance, in order to enable the 4K/HD XAVC S/MP4 clips from Sony Action Cam editable with Premiere Pro, you'd better transmute them into Premiere Pro editing-friendly format like MPEG-2 initially.
To accomplish the mission, you are highly recommended to adopt the professional yet easy-to-use Brorsoft Video Converter for Mac. With its help, you can effortlessly transcode XAVC S/MP4 footage from Sony Action Cam to Premiere Pro friendly MPEG-2 format with excellent output quality. Besides, it also enables you to transcode Sony Action Cam footage to Final Cut Pro, iMovie, Avid Media Composer, After Effect, etc NLEs catering for your diverse demands. More than that, it comes with all regular video editing tools like Trim, Crop, Effect, Subtitle, Watermark. For basic video editing tasks, you can even replace your Premiere Pro with it. If you work Sony ActionCam files in Adobe Premiere Pro on Windows, please get Brorsoft Video Converter to solve the issues.
 (Note: Click here for OS X 10.5)
Sony ActionCam XAVC S/MP4 and Premiere Pro Best Workflow
Step 1: Install and launch the Sony XAVC S/MP4 converter for Mac and click the “Add” button to load source files for converting. Check the “Merge into one” box, you can join several XAVC S/MP4 clips together.

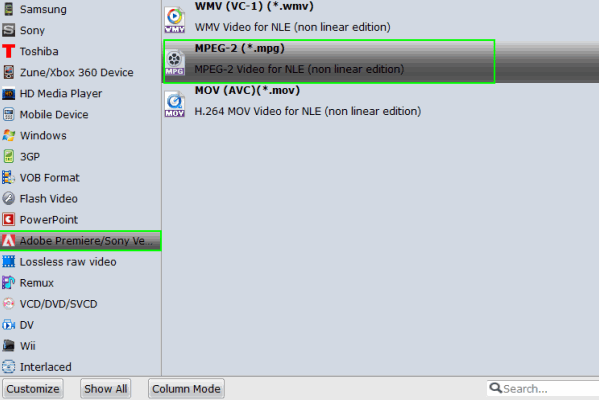
Step 2: Choose output format > Click "Format" bar and choose Adobe Premiere/Sony Vegas -> MPEG-2(*.mpg) as output format for editing raw 4K in Adobe with natively supported video codec.
Tip: Before the conversion, you can also perform the following operations with the help of this powerful Video Converter: trim large video files into small video segments; adjust video brightness, contrast, saturation and change video effect as a whole. Note: For gaining smooth workflow, you're suggested to compress 4K to 1080p videos. But if you stick to getting original 4K resolution, just keep the video size as original.
Step 3. Start the conversion
Now click the "Convert" button, and then leave the Mac Video Converter to do the rest automatically for you. After the Sony Action Cam to Premiere Pro Mac conversion, you can freely use your Sony Action Cam files on Premiere Pro CC7/CS6 as well as CS5/CS4/CS3 perfectly.
Tip: To import videos to Premiere Pro, you can:
1. Go to "File"> "import">"movies"
2. Drag media file directly to the left zone in the Premiere Pro main interface.
More Articles:
Import & Edit Sony FDR-AX53 XAVC S footage in Premiere Pro
How to Import and Edit Sony A6300 XAVC S footage in Premiere Pro
How to Work with Sony Action Cam Footage in Sony Vegas
No comments:
Post a Comment