A few days ago I was invited to attend a friend's wedding, the wedding was running smoothly and we played very happily. During the wedding, I used my new bought Sony RX1R II to record some amazing moments. After returning home, I intended to edit those captured videos in FCP 7 before uploading to YouTube and Facebook for sharing with friends and family. Unfortunately, something wrong happened to me, whenever I imported Sony RX1R II XAVC S footage into FCP 7, always a "codec error" message would pop up, eventually I failed to edit Sony XAVC S clips in FCP 7.
After searching high and low, I figured out the problem may do something with the XAVC S codec. According to the Apple official website, the complicated codec XAVC S(in an MPEG-4 wrapper) does not work with FCP X 10.0.9 and its older version. Therefore, some guys on concerned forums suggested me update my FCP version. It was so complicated and time-confusing that I gave up. Then the tip of converting XAVC S to ProRes for editing in FCP 7 accidentaly dashed into my eyes. I tried that method with its recommended third-party program - Brorsoft XAVC S to FCP Converter for Mac, which turned out beyond my imagination.
Overall, the program can effortlessly assit you transcode XAVC-S to Apple ProRes for FCP X/7/6 with several simple steps. Just do some clicks on your mouse with your finger, you can easily convert XAVC S files to ProRes .mov on Mac and then import XAVC S video into FCP X/7/6 for editing smoothly. Better still, the smart gadget also equipped with some easy but pratical editing functions like cropping, trimming, adding watermark, etc. Below is a brief workflow.
Download XAVC S to FCP 7 Converter:
 (Note: Click here for OS X 10.5)
Guide: Transcode and Import Sony XAVC S to Final Cut Pro 7
Step 1: Add XAVC S videos
Install the XAVC S converter program on Mac and run it. Drag the XAVC S files to the software. Or you can also click "Add" button on the top of the main interface to import video to the program.
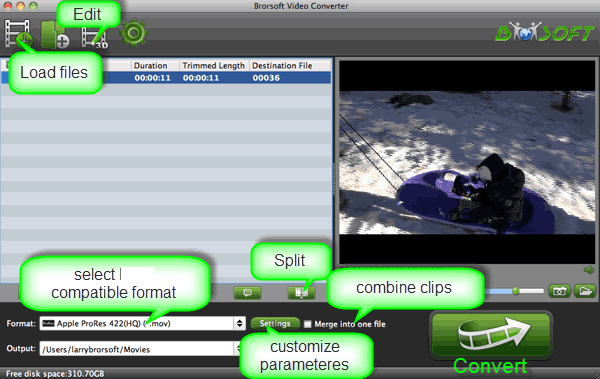
Step 2: Choose FCP compatible format
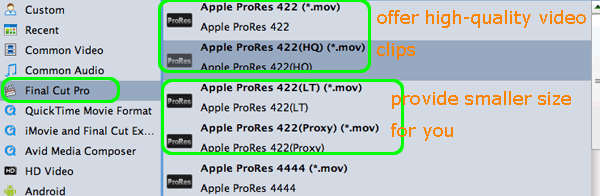
Go to "Format" bar and choose "Final Cut Pro > Apple ProRes 422 (*.mov)" as output format for editing XAVC S footage in Final Cut Pro X or FCP 7.
Tips: Adjust video, audio settings
Click the "Settings" button and customize proper video/audio parameters including Video size, bitrate and fame rate and mroe. Usually 1920*1080 video size and 30fps video frame rate are recommended for FCP editing. Well, if you prefer to work with 4K video, you can keep the original 4K resolution.
Step 3: Start XAVC S to ProRes conversion
Click "Convert" to start transcoding XAVC S to ProRes for FCP on Mac. After conversion, you can play or edit XAVC S clips in Final Cut Pro without problem.
Additional Tips:
Besides converting XAVC S to FCP, this XAVC S Converter Mac also supports encoding XAVC/XAVC S file to various video formats like Apple InterMediate Codec for iMovie, MPEG-2 for Adobe Premiere Pro, DNxHD for Avid Media Composer, MOV for QuickTime player, etc.
Related Articles:
Import Panasonic VariCam 35 4K MXF to FCP without hassles
Tricks for Editing Panasonic GH4 4K footage in Final Cut Pro 7
Import & Edit Canon XC10 4K XF-AVC onto Davinci Resolve
Convert and Import Canon C500 4K MXF to DaVinci Resolve for Editing smoothly
Workflow for Panasonic GH4 4K MP4/MOV to Premiere Pro
Importing DJI Phantom 3 4K to Premiere Pro for smooth editing
How to Import & Edit Canon EOS C500 MXF files onto Premiere and Avid
Guide on Converting 4K to 1080p ProRes on Mac/Windows
Avdshare Video Converter can Convert Canon C300 recorded MXF videos to any version of Premiere more friendly MPEG-2 video for successfully importing the Canon C300 recorded videos to Premiere for editing.https://www.avdshare.com/import-canon-c300-footage-into-premiere
ReplyDelete