
I bought a Panasonic Varicam 35 camcorder not long before, it looks awesome just like in the picture. After shooting a bunch of amazing 4K footage, I just intented to import those 4K videos into my Premiere Pro CS 6 for doing some modifications, but later lots of issues came to me. The error message "ERROR COMPILING MOVIE: UNKNOWN" popped up constantly whenever importing 4K videos recorded from the Panasonic Varicam 35 camcorder.
It nearly made me crazy, then doing some seraches on the Google, I figured out the videos recorded by Panasonic VariCam 35 are not compatible with Premiere Pro, and the optimal suggestion I recived is to convert those 4K meidas to Premiere Pro more edit-friendly video format MPEG-2 initially with the help of a third party program. As I was confusing which application is worth to choose, when a friend recommended the Brorsoft 4K Video Converter for Mac to me. Thanks God, it works! Importing and editing VariCam 35 4K video files in Premiere Pro without rendering time is really fast. The crucial point is I appreciate the output quality.
The 4K Video Converter for Mac also has the ability to encode/re-encode 4k H.264(MP4), XAVC, XAVC S, etc footage for smoothly importing and editing in various non-linear editing systems (NLE), including Adobe Premiere Pro, Avid Media Composer, Final Cut Pro, iMovie, FCE and more. If you work 4K files in Adobe Premiere Pro on Windows PC, please get Brorsoft Video Converter to solve the issues. Below is a simple tutorial to merge VariCam 35 4K clips to MPEG-2 for Premiere Pro editing.Let's take a look!
Download the 4K Video Converter for Mac
 (Note: Click here for OS X 10.5)
How to import Panasonic VariCam 35 4K video into Adobe Premiere Pro
Step 1. Add raw files > Run the program you just set up. Drag and drop the 4K video files to the converter. You can also hit Add files button to import videos to the app. If you wanna combine several videos into one file, you can click the "Merge into one" box.

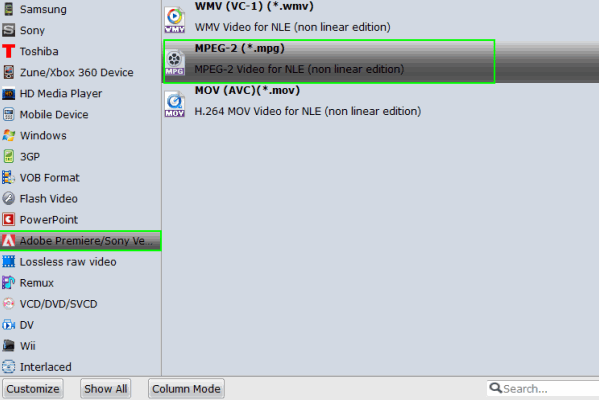
Step 2. Choose output format > Click "Format" bar and choose Adobe Premiere/Sony Vegas -> MPEG-2(*.mpg) as output format for editing raw 4K in Adobe with natively supported video codec.
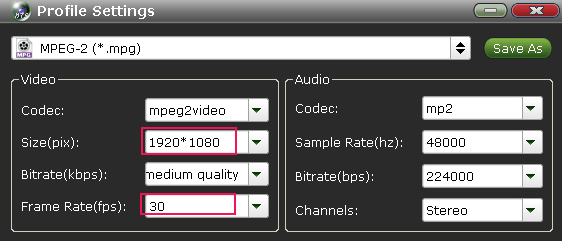
Step 3. Advanced V/A settings > Click "Settings" button if you'd like to customize advanced audio and video parameters like Video Codec, aspect ratio, bit rate, frame rate, Audio codec, sample rate, audio channels. Note: If you want to get original 4K resolution, just keep the video size as original.
Step 4. Start converting 4K footage > Hit the convert button of the best 4K Video Converter. It will start converting 4K for importing to Adobe Premiere Pro immediately. Soon after the conversion, just click "Open" button to get the generated files for natively editing in Premiere Pro CC7/CS6 as well as CS5/CS4/CS3 perfectly.
Related Articles:
Working with Canon C300 Mark II 4K footage in Premiere Pro CC/CS6/CS5/CS4
Convert and Import Canon C500 4K MXF to DaVinci Resolve for Editing smoothly
Workflow for Panasonic GH4 4K MP4/MOV to Premiere Pro
Working with Panasonic HC-VX870K 4K Videos in iMovie
Panasonic HC-VX870K 4K Workflow with Avid Media Composer
Avdshare Video Converter can Convert Canon C300 recorded MXF videos to any version of Premiere more friendly MPEG-2 video for successfully importing the Canon C300 recorded videos to Premiere for editing.https://www.avdshare.com/import-canon-c300-footage-into-premiere
ReplyDelete