
As the world's first DSLM with 4K cinematic recording capability, the Panasonic LUMIX DMC-GH4 can capture either Quad HD (3840 x 2160) at up to 29.97p or 'Cinema 4K' (4096 x 2160) at up to 24p and it can store that footage at a 100Mbps bitrate using IPB compression in an MP4 or MOV container format. Above all, the 4K footage recorded from Panasonic GH4 just looks amazing and stunning. If you are a photography enthusiasts, you won't miss it! However, currently 4K footage is not widely supported yet, so few video software including Premiere Pro can handle it perfectly. Then you may wonder what's the available way to edit GH4 4K in Adobe Premiere Pro smoothly?
As you see, Panasonic GH4 captures 4K videos in MP4, MOV format. But the problem is, H.264 MP4/MOV file format from Panasonic GH4 is beyond the compatibility of Adobe Premiere Pro. Something else, Premiere Pro CS6, CC 7 can (usually) handle 4K files without much problem, but it is extremely hardware intensive. In most cases, editing 4K in Premiere Pro CC/CS6/CS5 is very taxing on your computer. In order to work Panasonic GH4 4K footage in Adobe Premiere smoothly, a better way is to transcode Panasonic GH4 4K to a more “edit” friendly codec and 1080p would be the best settings.
Actually, it's not as difficult as you imagine. What's need is just a common video converter like Brorsoft Video Converter for Mac. Overall, this video conversion program can effortlessly encode/re-encode 4K H.264(MP4/MOV), XAVC, XAVC S, etc footage for smoothly importing and editing in various non-linear editing systems (NLE), including Adobe Premiere Pro, Avid Media Composer, Final Cut Pro, iMovie, FCE and more. If you work 4K files in Adobe Premiere Pro on Windows PC, please turn to 4K Video Converter to solve the issues. Now just download it and follow the step-by-step guide to learn how to work GH4 4K videos with your editing software smoothly. Keep reading for a brief how-to on each process.


Quick Tutorial on how to convert GH4 4K footage for editing in Premiere Pro
Step 1. load GH4 4K videos
Run the program you just set up. Drag and drop the 4K video files to the converter. You can also hit Add files button to import videos to the app. If you wanna combine several videos into one file, you can click the "Merge into one" box.

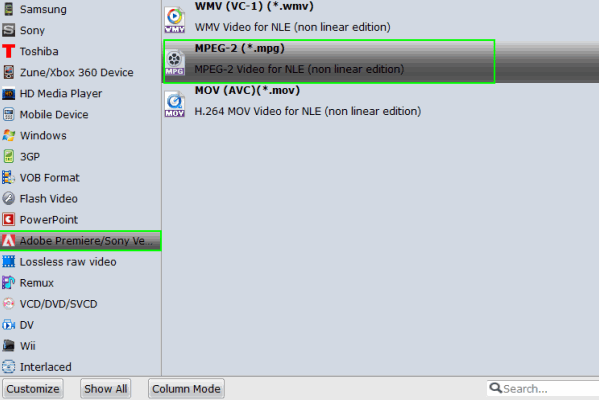
Step 2. Choose output format
Click "Format" bar and choose Adobe Premiere/Sony Vegas -> MPEG-2(*.mpg) as output format for editing Panasonic GH4 4K in Adobe Premiere Pro with natively supported video codec.
Tips: Click "Settings" button if you'd like to customize advanced audio and video parameters like Video Codec, aspect ratio, bit rate, frame rate, Audio codec, sample rate, audio channels. Note: If you want to get original 4K resolution, just keep the video size as original.
Step 3. Start converting 4K footage to Premiere
Hit the convert button of the best 4K Video Converter. It will start converting 4K for importing to Adobe Premiere Pro immediately. Soon after the conversion, just click "Open" button to get the generated files for natively editing Panasonic GH4 4K video in Premiere Pro CC7/CS6 as well as CS5/CS4/CS3 perfectly.
Related Guides:
Panasonic HC-VX870K 4K Workflow with Avid Media Composer
Working with Panasonic HC-VX870K 4K Videos in iMovie
Avdshare Video Converter can Convert Canon C300 recorded MXF videos to any version of Premiere more friendly MPEG-2 video for successfully importing the Canon C300 recorded videos to Premiere for editing.https://www.avdshare.com/import-canon-c300-footage-into-premiere
ReplyDeleteAvdshare Video Converter can Convert Canon C300 recorded MXF videos to any version of Premiere more friendly MPEG-2 video for successfully importing the Canon C300 recorded videos to Premiere for editing
ReplyDelete